How to Fix the DNS_PROBE_FINISHED_BAD_CONFIG Error Code (11 Solutions)
Seeing the DNS_PROBE_FINISHED_BAD_CONFIG error while visiting a website? As unsettling as it is, it’s possible to happen in any browser or OS.
This DNS error indicates that the browser could not resolve the website IP address correctly. That may be due to several DNS problems. Thankfully, as happens in most DNS issues, several simple solutions will help you solve them.
Read along to learn why the DNS_PROBE_FINISHED_BAD_CONFIG error code is a common problem and ways to fix it.
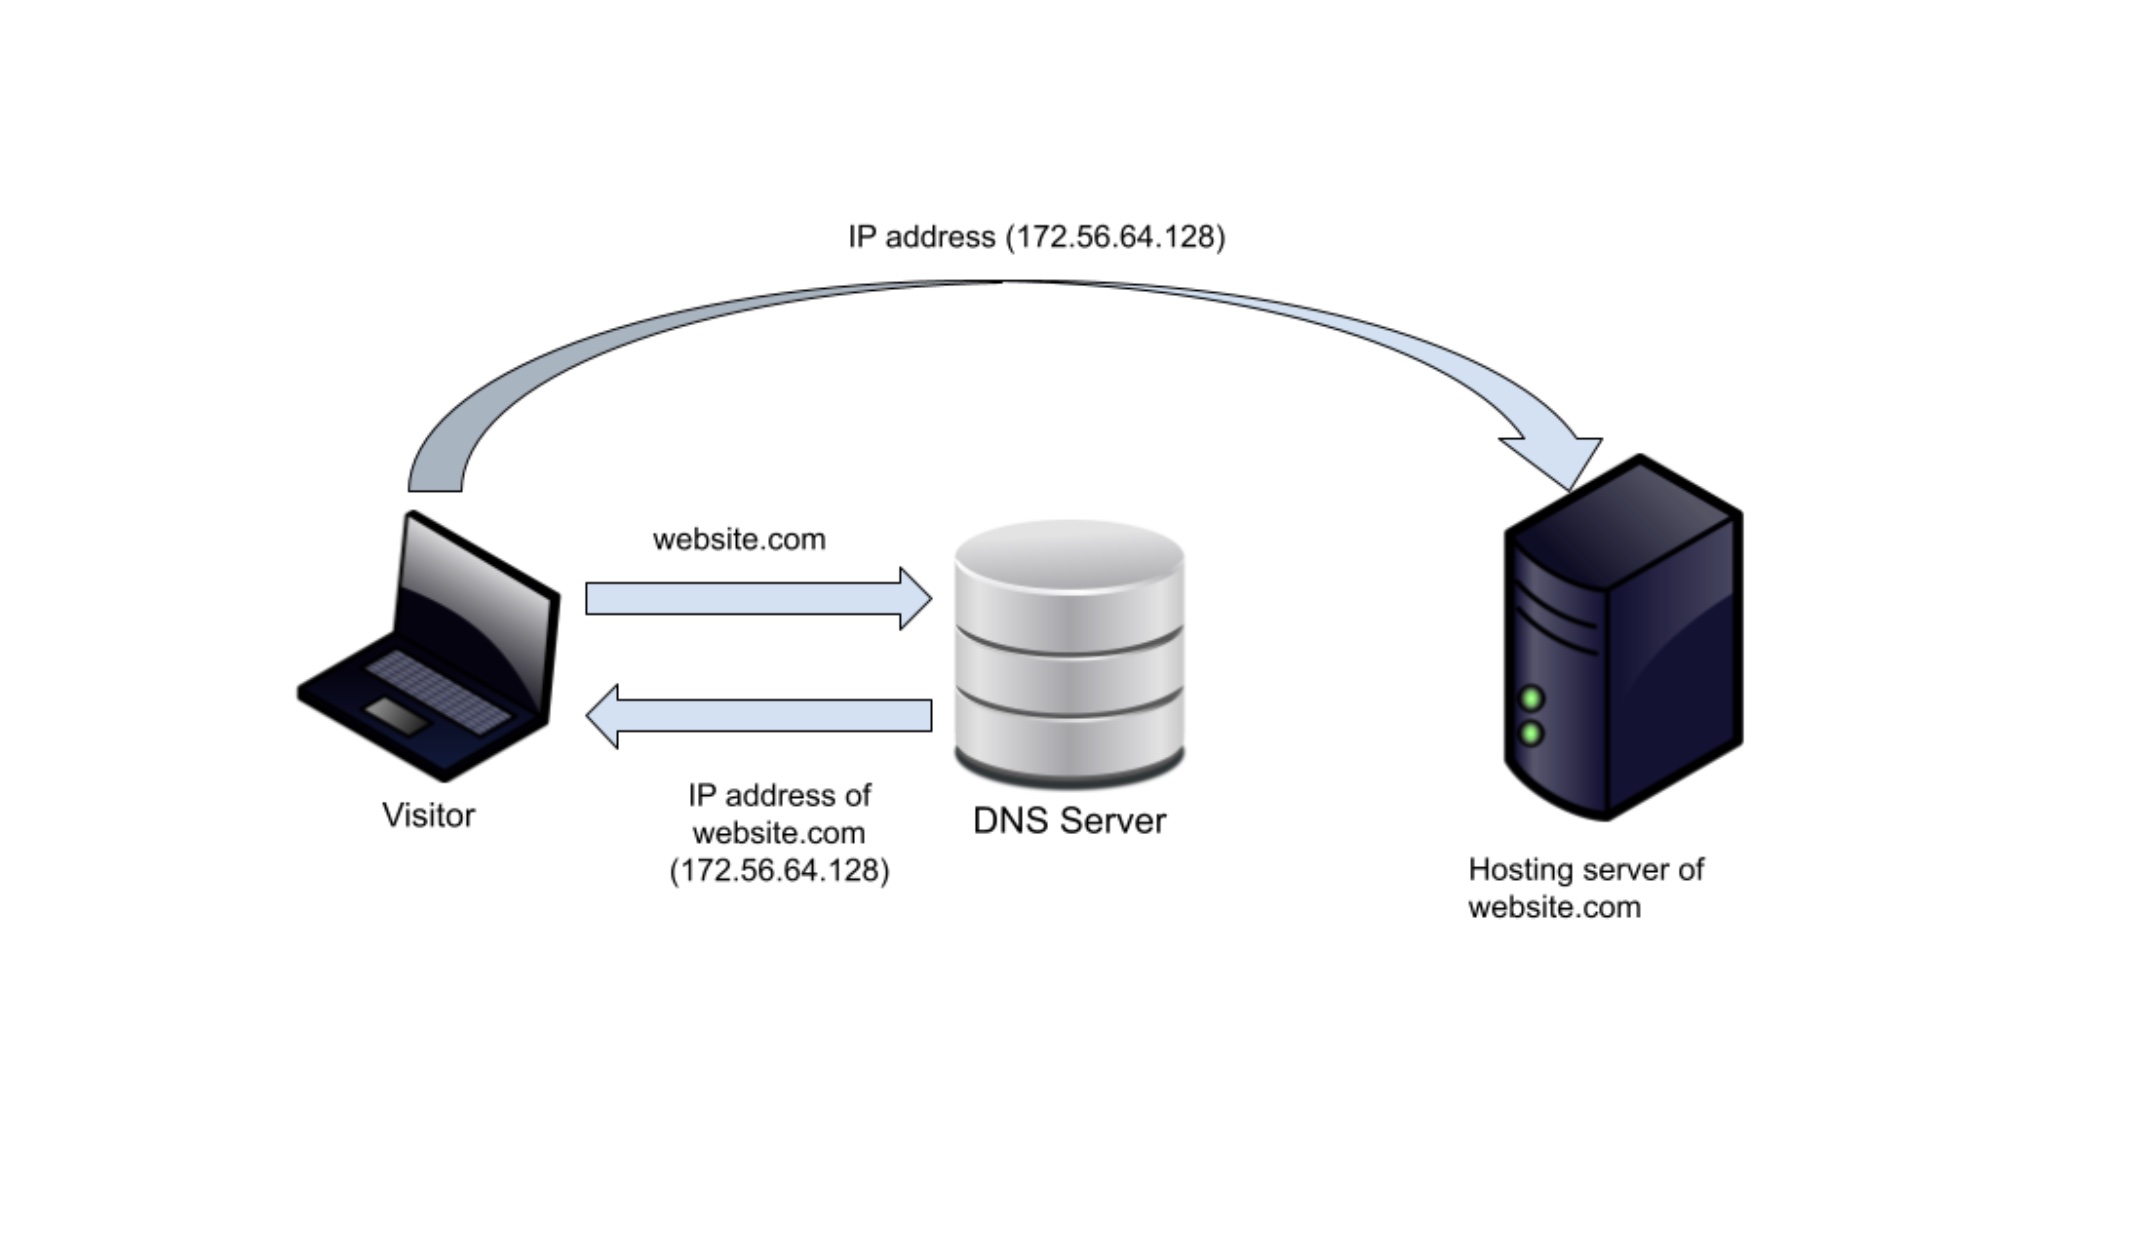
For instance, if you enter google.com in your browser, the DNS system translates it to its corresponding IP address to serve the site to you.
The Domain Name System makes it easy for users to browse the web by simply typing in a website’s name instead of remembering its IP address.
Every website is associated with a unique IP address and a corresponding domain name, also known as a Uniform Resource Locator (URL). You can think of the DNS as your phone’s contacts list. Instead of having to remember each person’s number, you can save it with a name and speed-dial it.
In the same manner, the domain relates to the website IP address, so you don’t have to memorize it. You can open the website by just typing its domain in your browser.
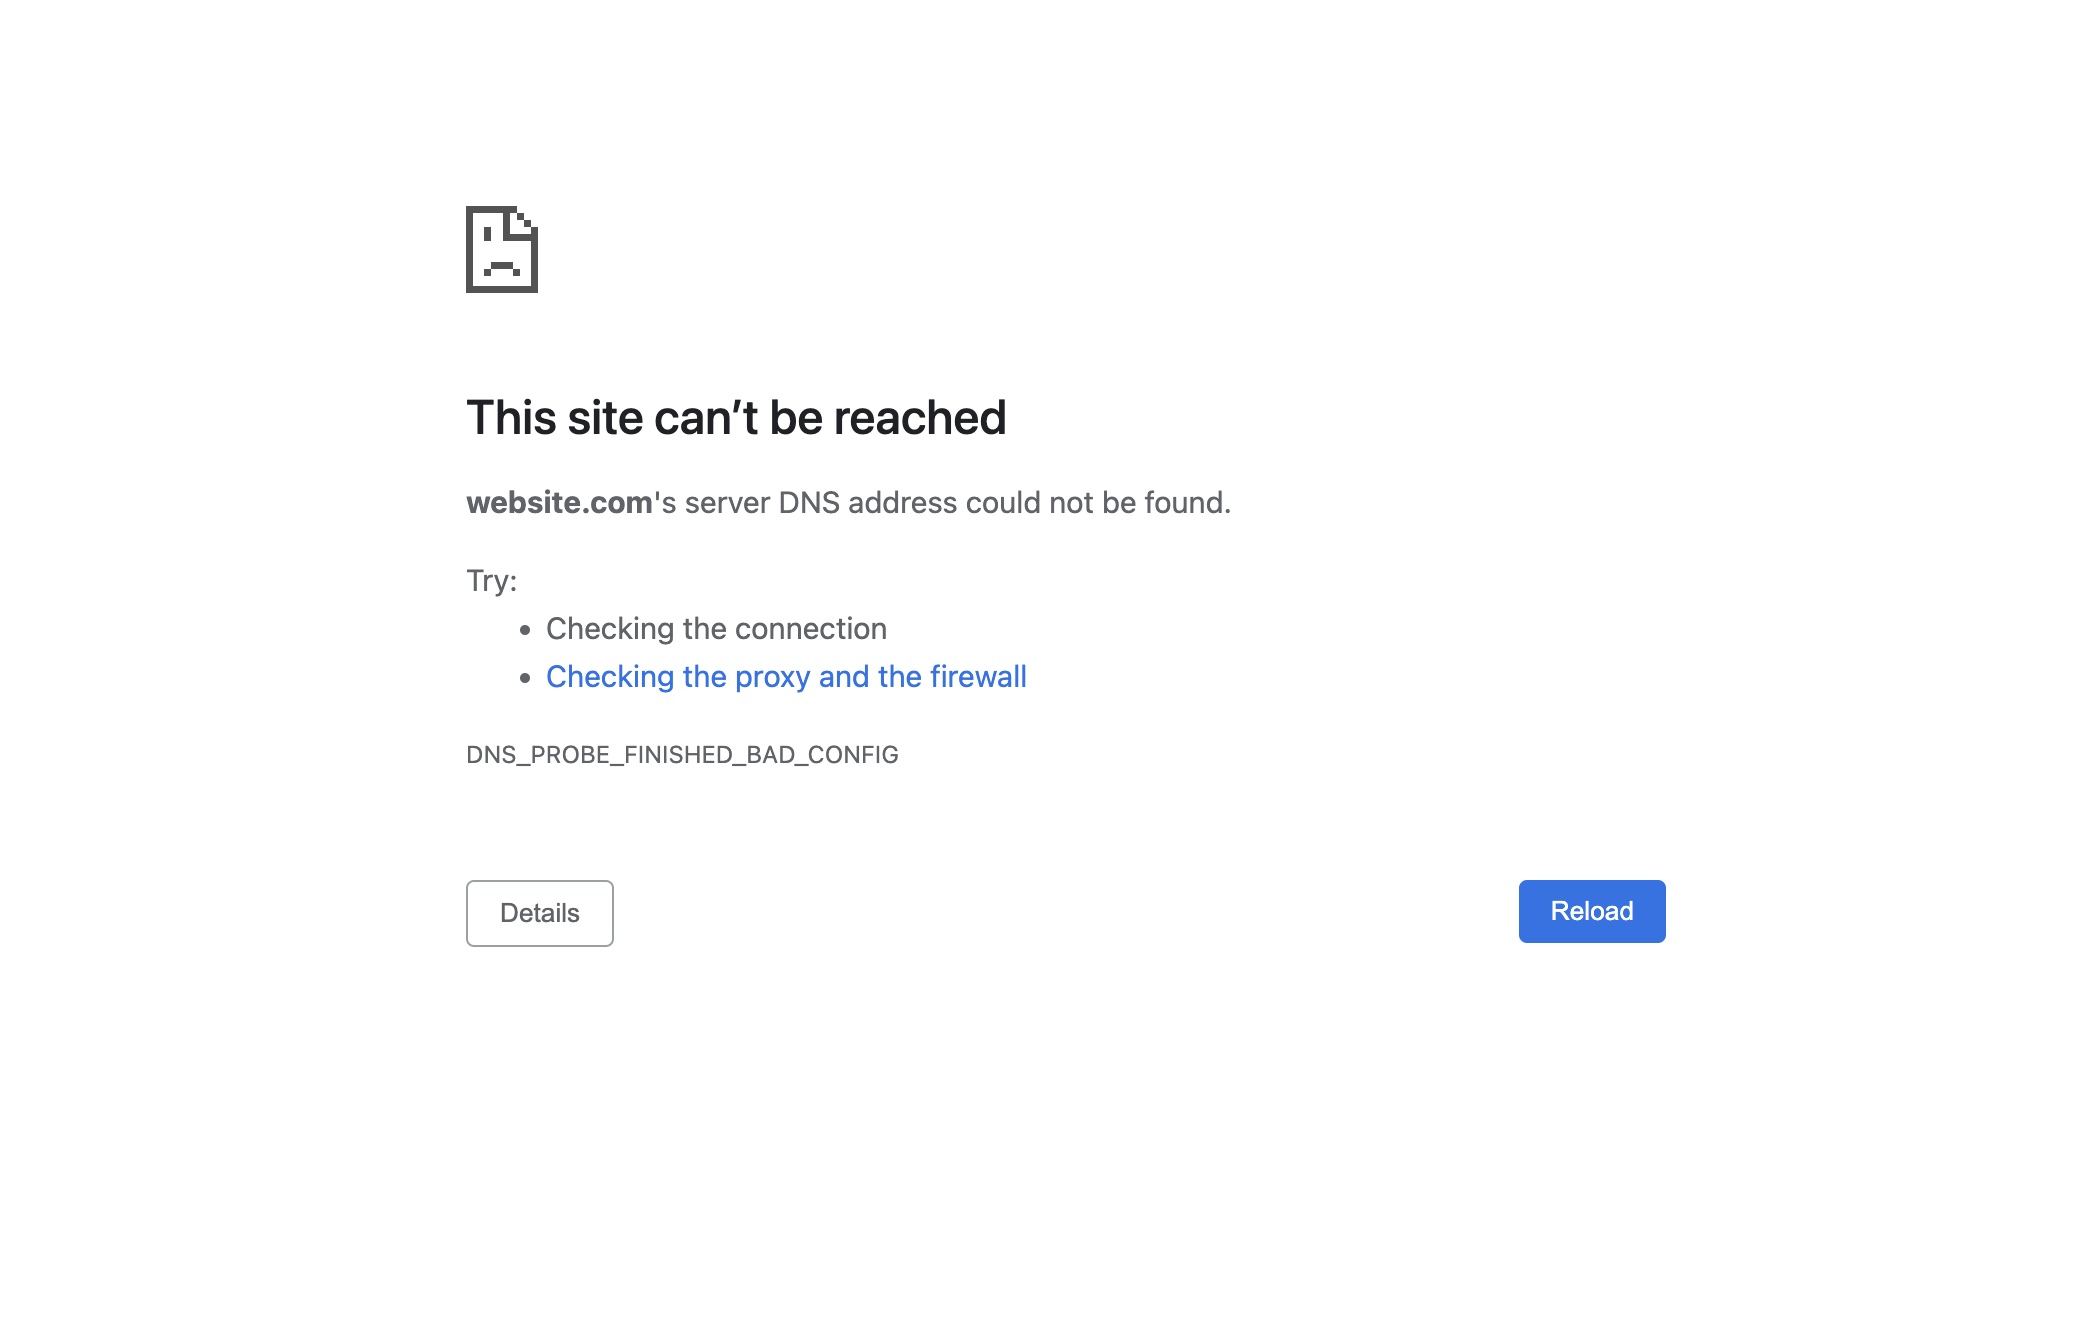
When you encounter this error, it means that your device is having trouble communicating with the DNS server. Thus, your browser can’t resolve the website’s IP address and acknowledges the problem with the message DNS_PROBE_FINISHED_BAD_CONFIG.
This DNS error can be due to several reasons, like a problem with your internet connection, a misconfigured router, or an issue with the DNS servers.
Fortunately, you can take some simple steps to troubleshoot and fix the DNS_PROBE_FINISHED_BAD_CONFIG error. Before we show you how to fix it, we’ll take a look at the causes of this error message.
What Causes the DNS_PROBE_FINISHED_BAD_CONFIG error?
DNS_PROBE_FINISHED_BAD_CONFIG tells you that your browser can’t connect to the DNS server of the website you are trying to visit. That may stem from different starting points. Here are some of the most common reasons:
- Network Settings – Possibly, your network connection settings have been changed without your knowledge, resulting in the DNS_PROBE_FINISHED_BAD_CONFIG error. This happens if your device is not properly connected to your network or if there was an unintentional DNS server change within the network settings.
- Router Settings – If an unauthorized app modifies your router settings, it can interfere with the IP or DNS address, causing the DNS_PROBE_FINISHED_BAD_CONFIG error. This can be a concern as you may not be aware of the changes made to your router settings.
- Expired or invalid browser cache and cookies – Your browser saves cache and cookies from previous online sessions to speed up your connection. However, this browsing data can occasionally become corrupted or expired, triggering the DNS_PROBE_FINISHED_BAD_CONFIG error.
- Browser Extensions – New browser extensions can sometimes interfere with the IP or DNS address, leading to the DNS_PROBE_FINISHED_BAD_CONFIG error.
- Outdated browser – Like any other application, an outdated browser could cause various problems. One of them might be connectivity issues with some websites, which can result in a DNS error.
- Firewall or Antivirus Software – Occasionally, problematic antivirus or firewall software can cause the DNS_PROBE_FINISHED_BAD_CONFIG error. When either software blocks your browser’s access to certain websites, it can trigger this error.
- Corrupted Files – Corrupted files on your device can also lead to the DNS error. Malware or corrupted system files can disrupt the DNS configuration, leading to that error.
- Local problems in your device’s DNS settings – Expired DNS cache in your OS or incorrectly renewed IP address for your device can also contribute to the DNS_PROBE_FINISHED_BAD_CONFIG error.
- Connectivity issue with your DNS server – The designated DNS server by your ISP (Internet Service Provider) could be down, or you have trouble connecting to it. As a result, your browser could display the error.
It is important to understand that the DNS_PROBE_FINISHED_BAD_CONFIG error can be caused by a variety of factors. By identifying the potential causes, you can take the necessary steps to troubleshoot and resolve the issue.
How to Fix the DNS_PROBE_FINISHED_BAD_CONFIG Error Code (5 Easy and 6 Advanced Fixes)
Let’s dive in and fix this error message.
Before proceeding, ensure your internet cable is properly attached and plugged in correctly. It also helps to reload the page to check whether your network connection is temporarily broken.
After eliminating these options, you can proceed with the other troubleshooting methods.
Let’s examine 11 possible fixes for DNS_PROBE_FINISHED_BAD_CONFIG errors:
1. Restart the Router (Easy)
We will start with a few simple methods and move on to more advanced troubleshooting.
One of the easiest ways to troubleshoot various errors is restarting your router, which helps you reset your IP address.
You need to turn off the power and wait one minute until you get everything shut down. Then turn the power back on. While rebooting your router, you can restart your computer too.
When your computer and router are restarted and back on, you can visit the site again to see if the issue is resolved. If you still see the DNS error message – move on to the next point.
2. Clear Browser Cache (Easy)
Expired or invalid browsing data, such as cached files and cookies, can often obstruct the connection to specific websites. This problem can manifest as the error DNS_PROBE_FINISHED_BAD_CONFIG on your browser.
Clearing your browsing data usually solves such connectivity issues. Check the articles below to find detailed steps for clearing the local cache from your device:
- How to clear the cache on your desktop browser
- How to clear the cache on your Android device
- How to clear the cache on your iPhone
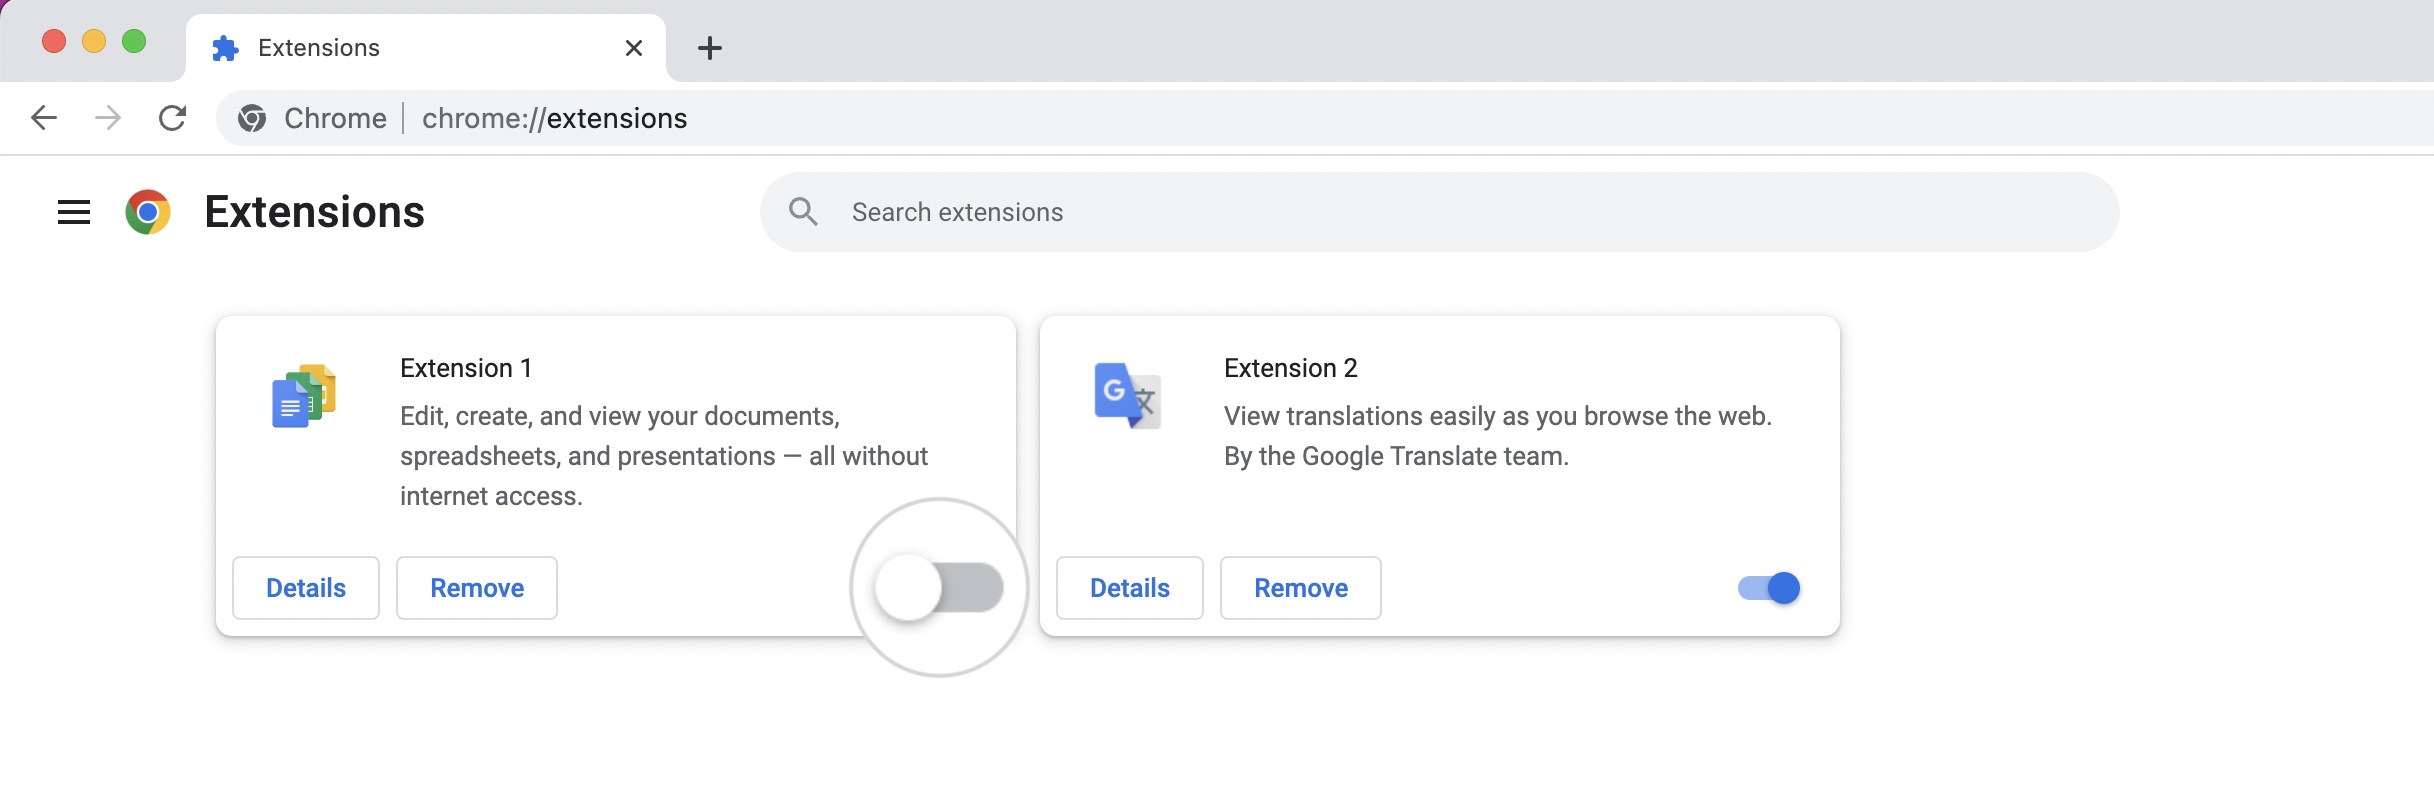
3. Disable Browser Extensions (Easy)
Browser extensions are useful in expanding the functionality of your browser. However, some of them might interfere with the connection to certain websites.
To check whether one of them is causing the error DNS_PROBE_FINISHED_BAD_CONFIG, disable your installed extensions one by one.
Follow the steps below to disable the Chrome extensions.
- Open the kebab menu at the top right corner and select More Tools > Extensions.

- Each installed extension has an ON/OFF switch. Turn off the extensions one by one and test opening the site. If one of them causes the problem, the error message will be gone when disabled.
4. Update Your Browser (Easy)
An outdated browser is prone to all sorts of incompatibilities. One of them might be the incorrect resolution of websites which the error DNS_PROBE_FINISHED_BAD_CONFIG indicates.
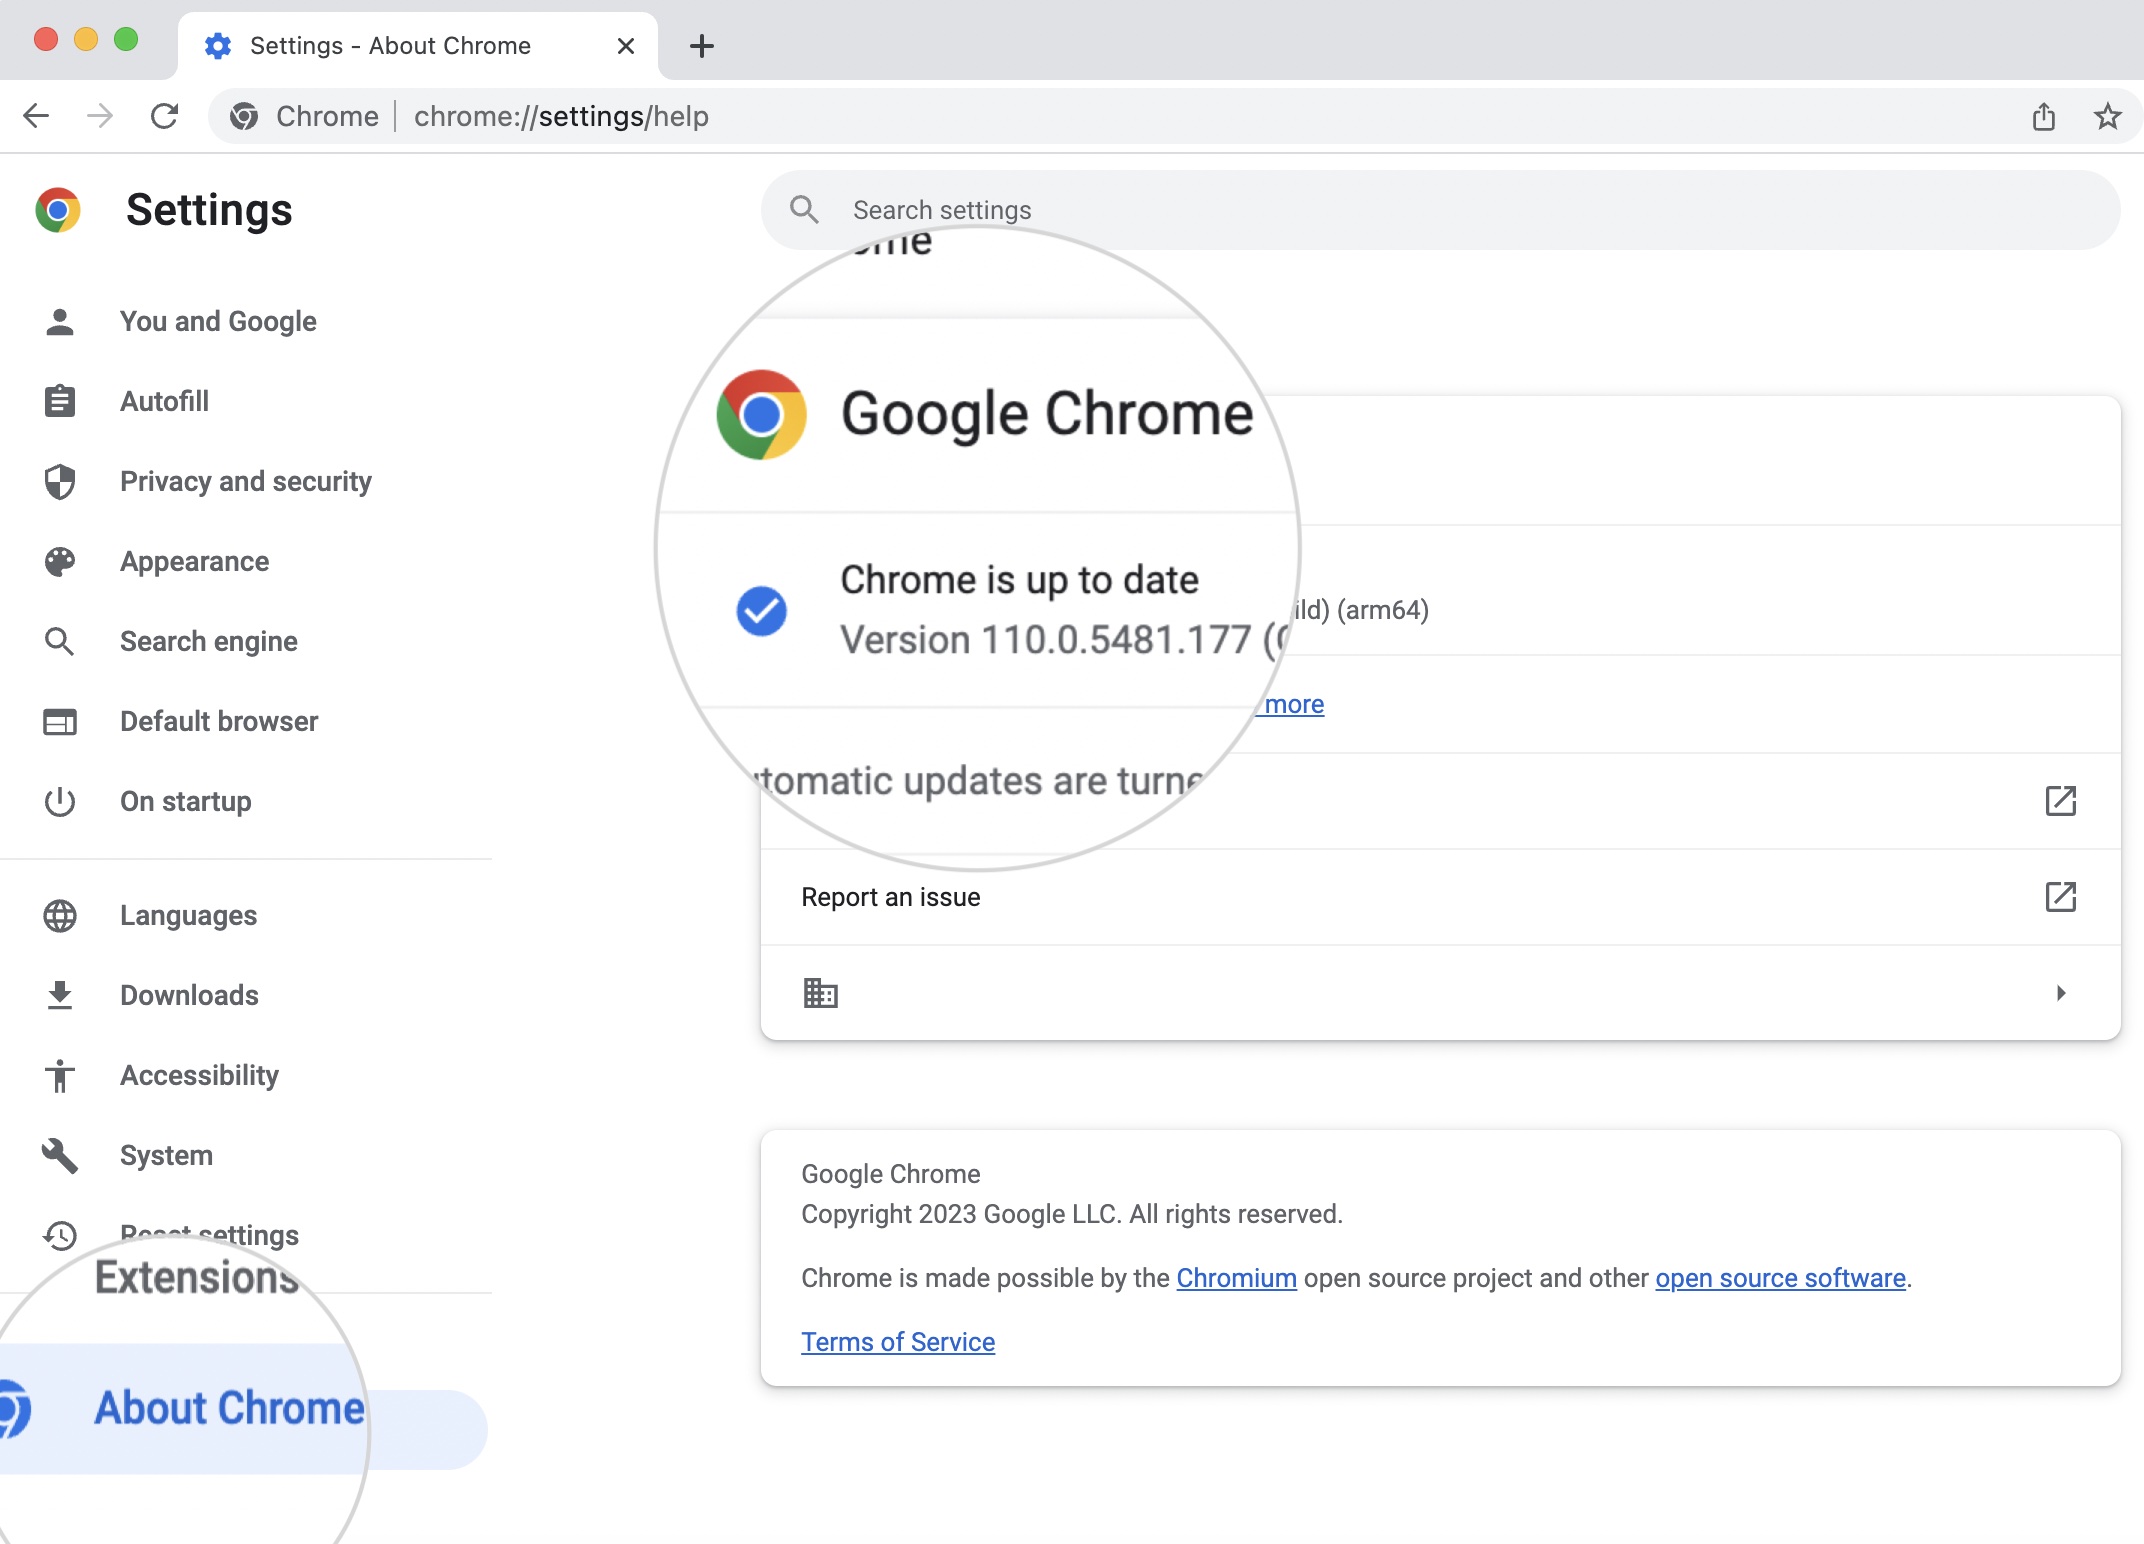
Make sure to update your browser to the latest stable version. The following steps describe how to update your Chrome browser.
- Open the kebab menu in the top right corner and select Settings.
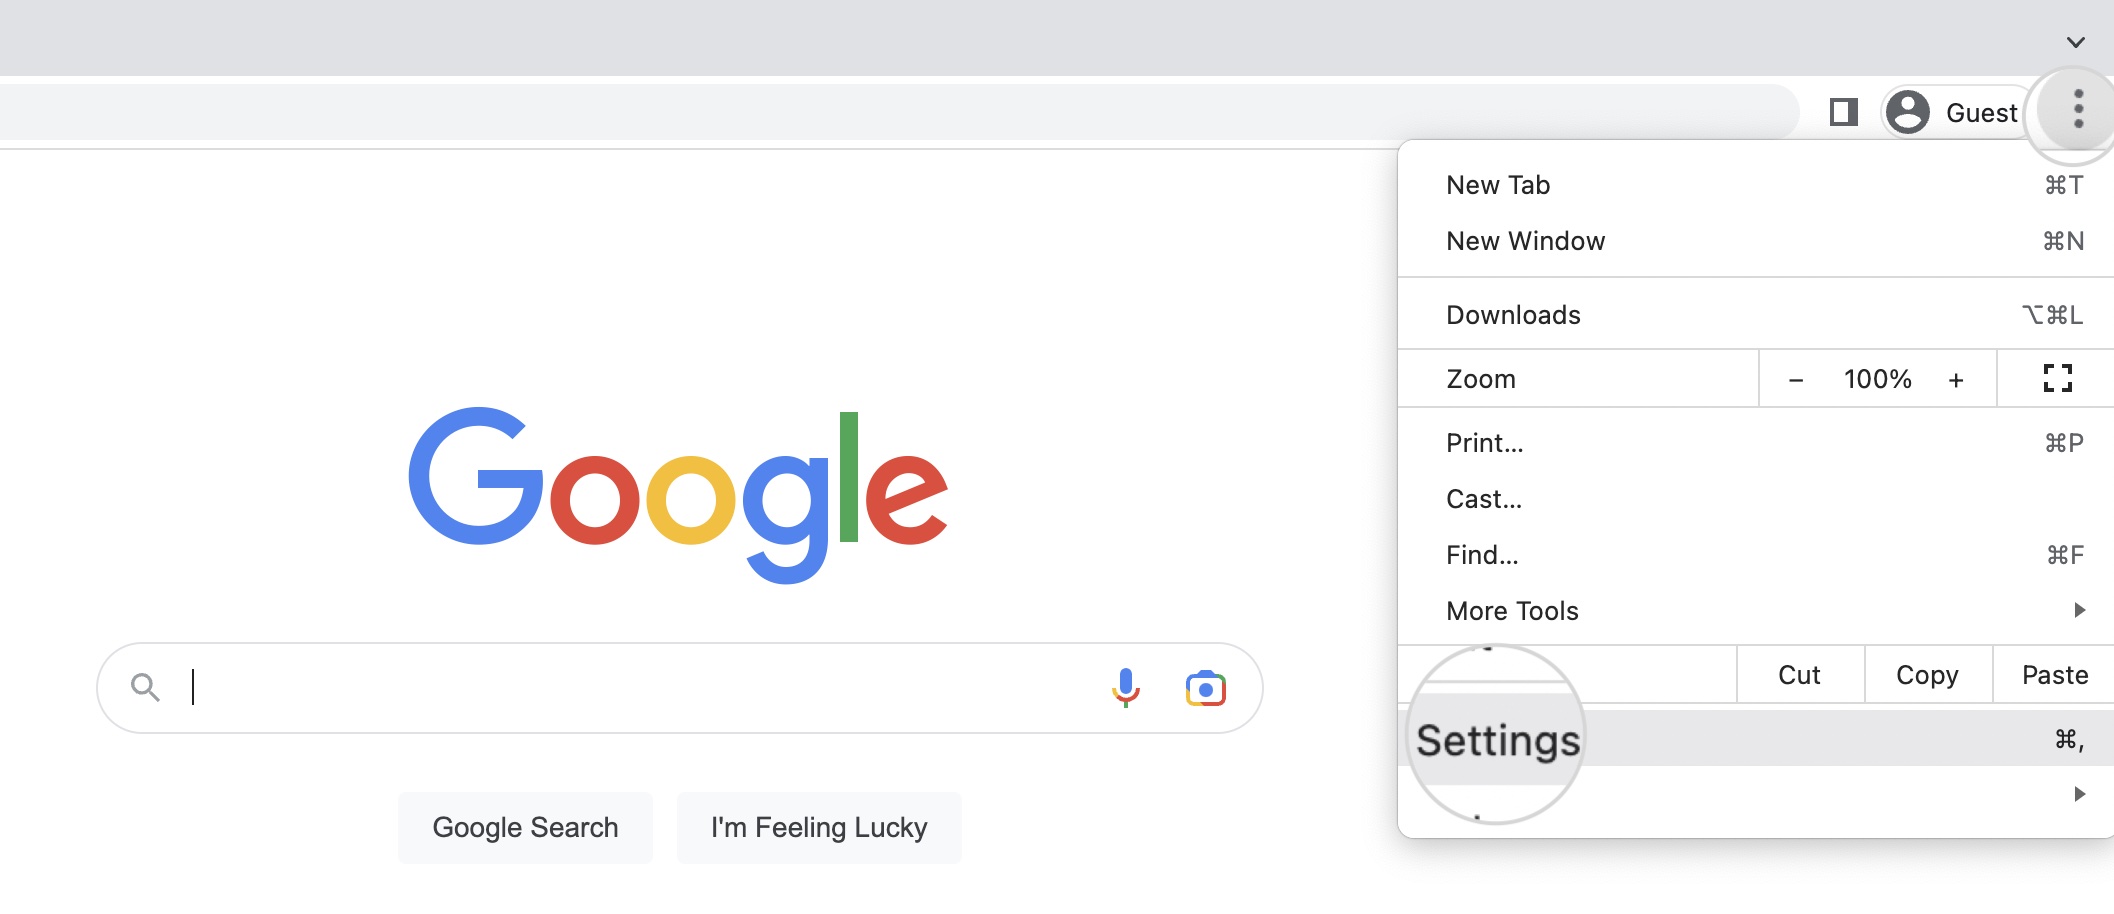
- Choose the section About Chrome. Here you can see whether Chrome is up to date. If there is an available update, press the button Update Google Chrome.
5. Disable Antivirus Software and Firewalls (Easy)
It is common for antivirus and firewall software to conflict with a device’s network settings. They can also affect the connection to web servers. Test temporarily disabling either software and reloading the website. If the error is gone, it’s an indication your security software was causing it.
Contact the service support team or consider replacing it with alternative software.
Alternatively, if the DNS issues appear only on certain websites, you may add them to the whitelist of your antivirus or firewall program.
6. Delete Temporary Files (Advanced)
All web browsers store data in temporary files. Those files, however, can become corrupted and conflict with DNS records, causing the DNS error DNS_PROBE_FINISHED_BAD_CONFIG. Therefore, deleting all the temporary files is a straightforward solution that can fix the error.
The deletion of temporary files is different for Windows and MacOS. So, you must follow the steps for your OS below.
Windows
To delete temporary files on your Windows computer, you can either use the Storage page in Windows Settings or manually delete files from the Temp folder.
Delete temporary files from Storage
- Open the Windows menu in the lower left corner.
- Type “storage” in the Search bar.
- Click on the first result – Storage Settings.
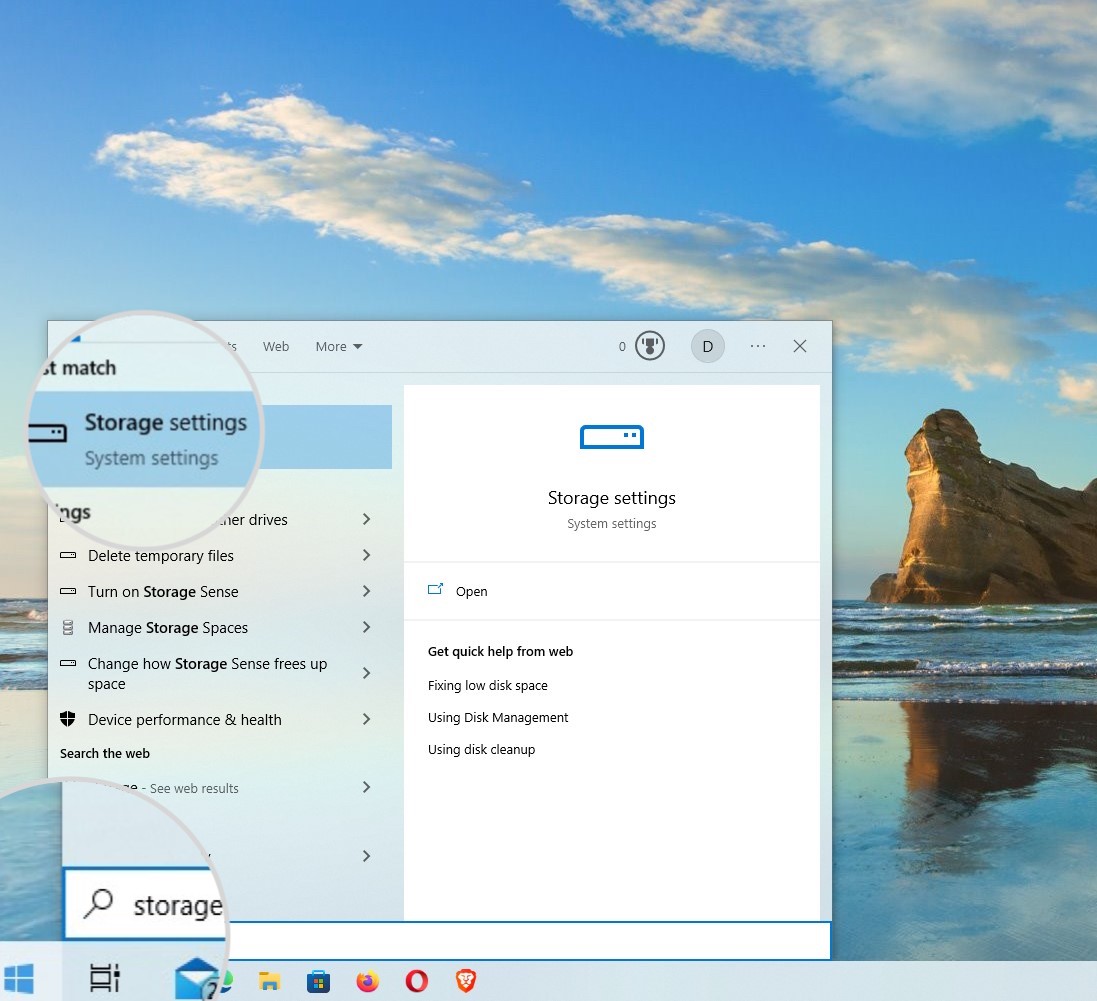
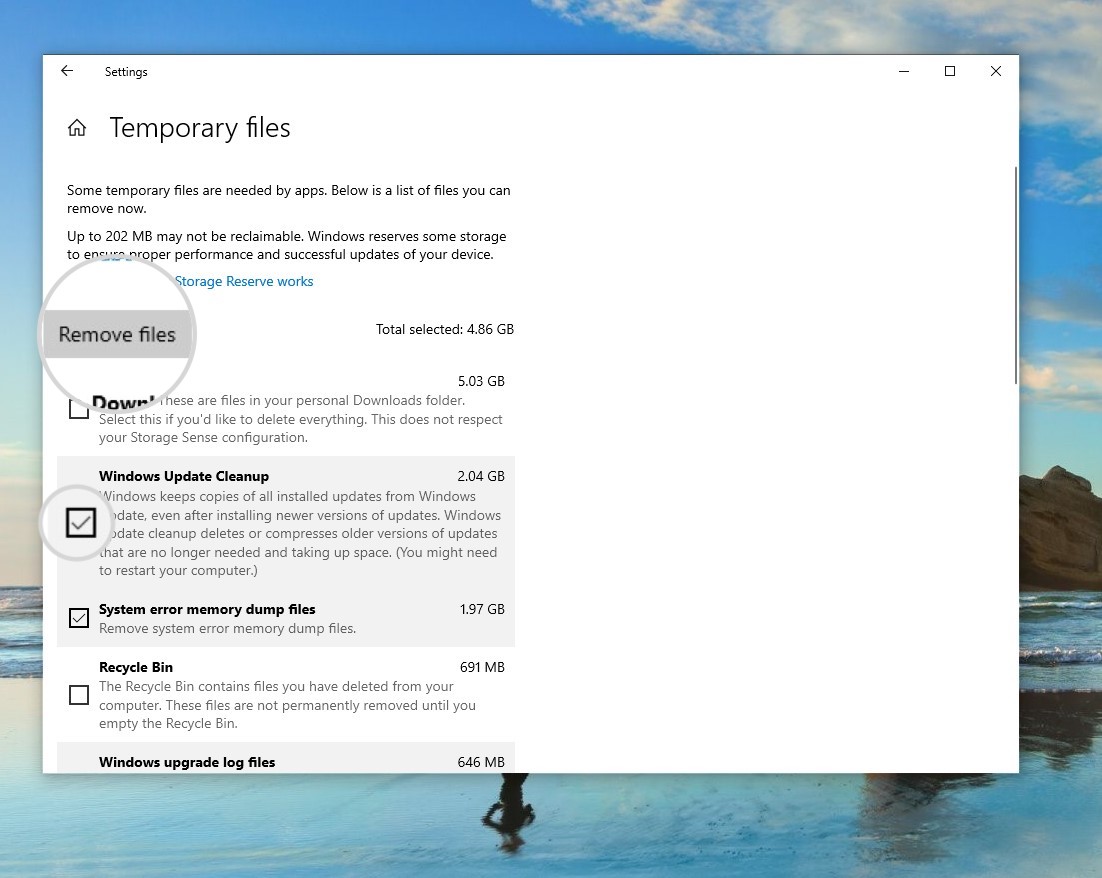
- On the Storage page, choose Temporary Files.
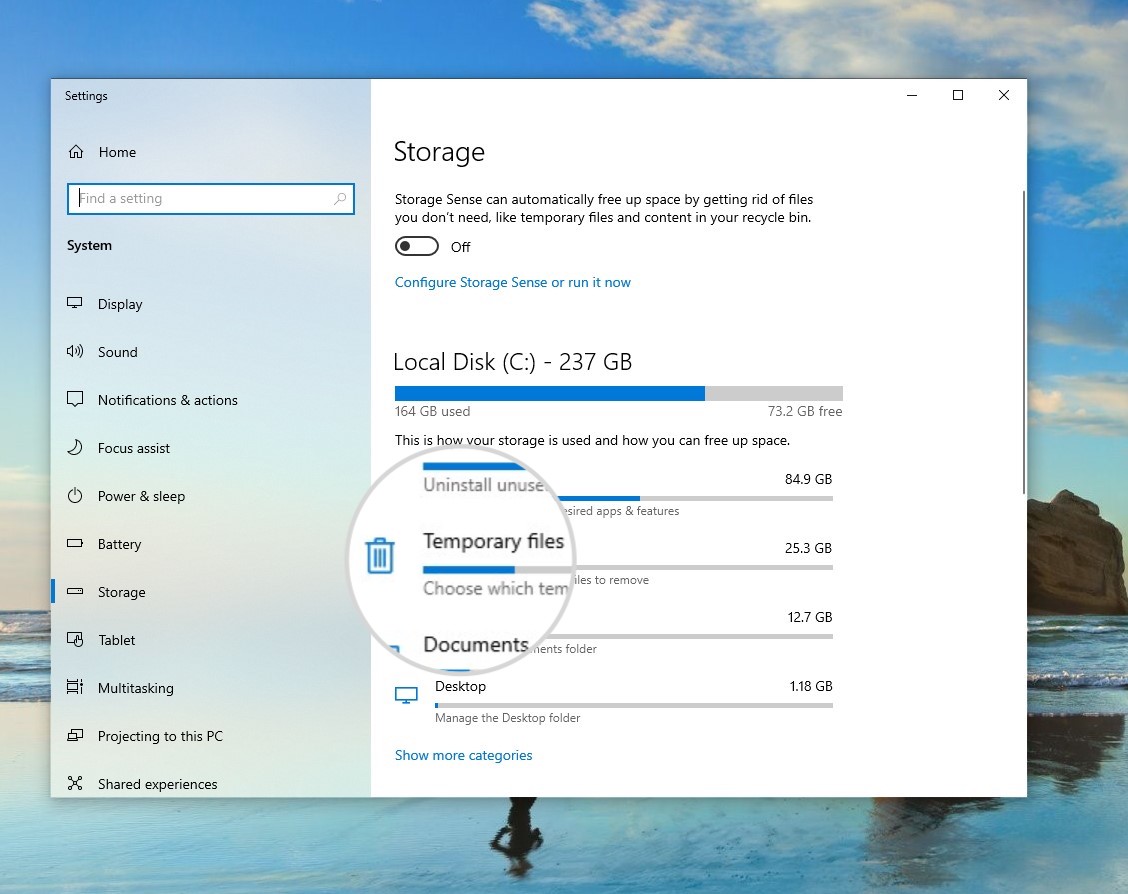
- Select the file types you want to delete and confirm your choice with the Remove files button.
Manually delete temporary files
- Open the Windows menu in the lower left corner. Type “run” in the search bar and open the first result – Run app.
- In the Run app, type %temp% and press OK.
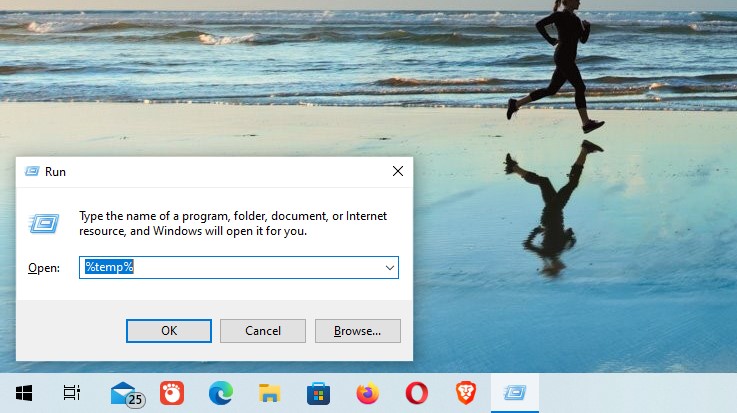
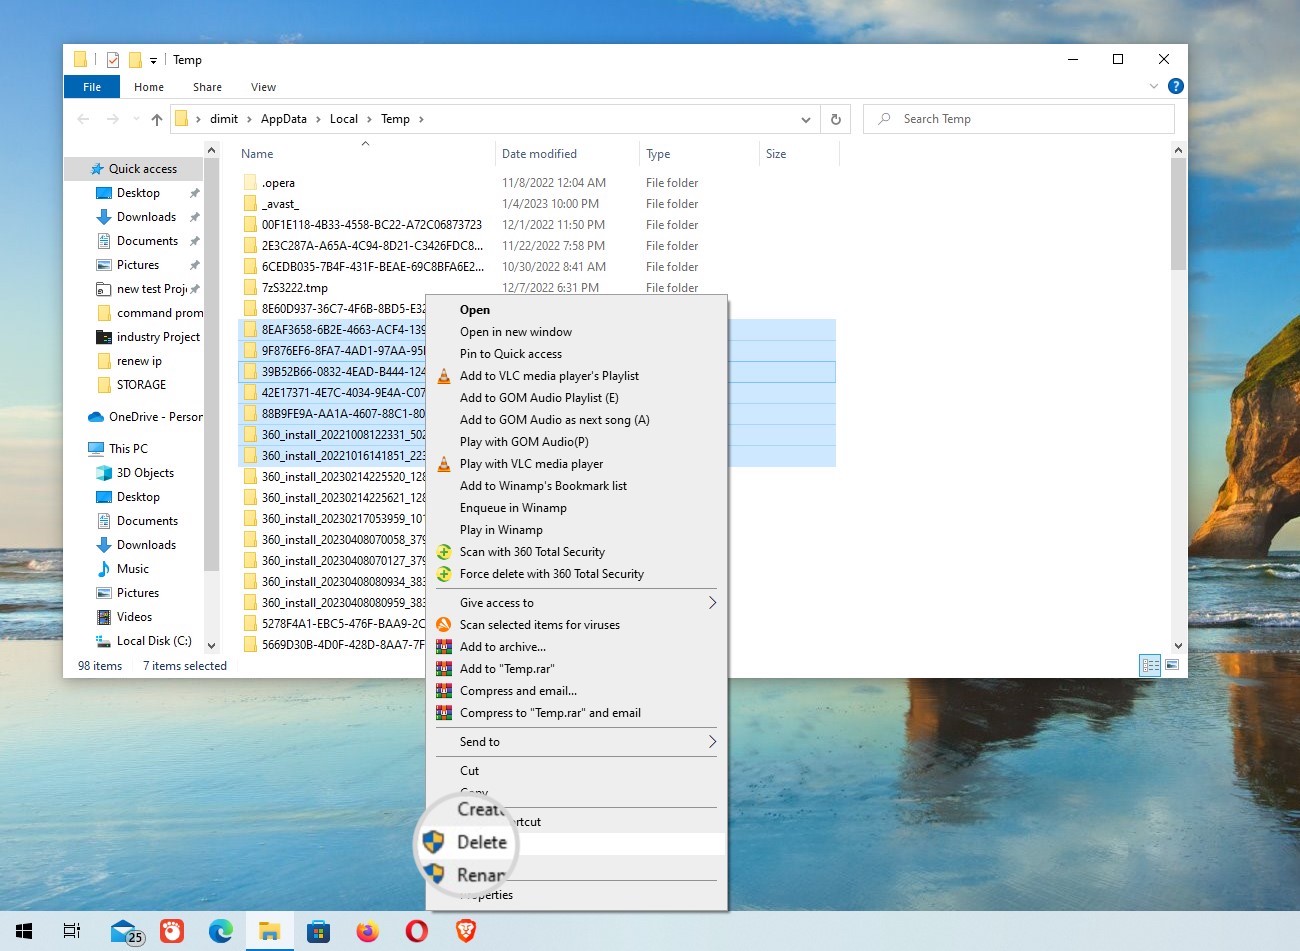
- Windows will open the temporary files folder. Select the files and folders you want to delete.
- Right-click on the selected files, and In the drop-down menu, select Delete.
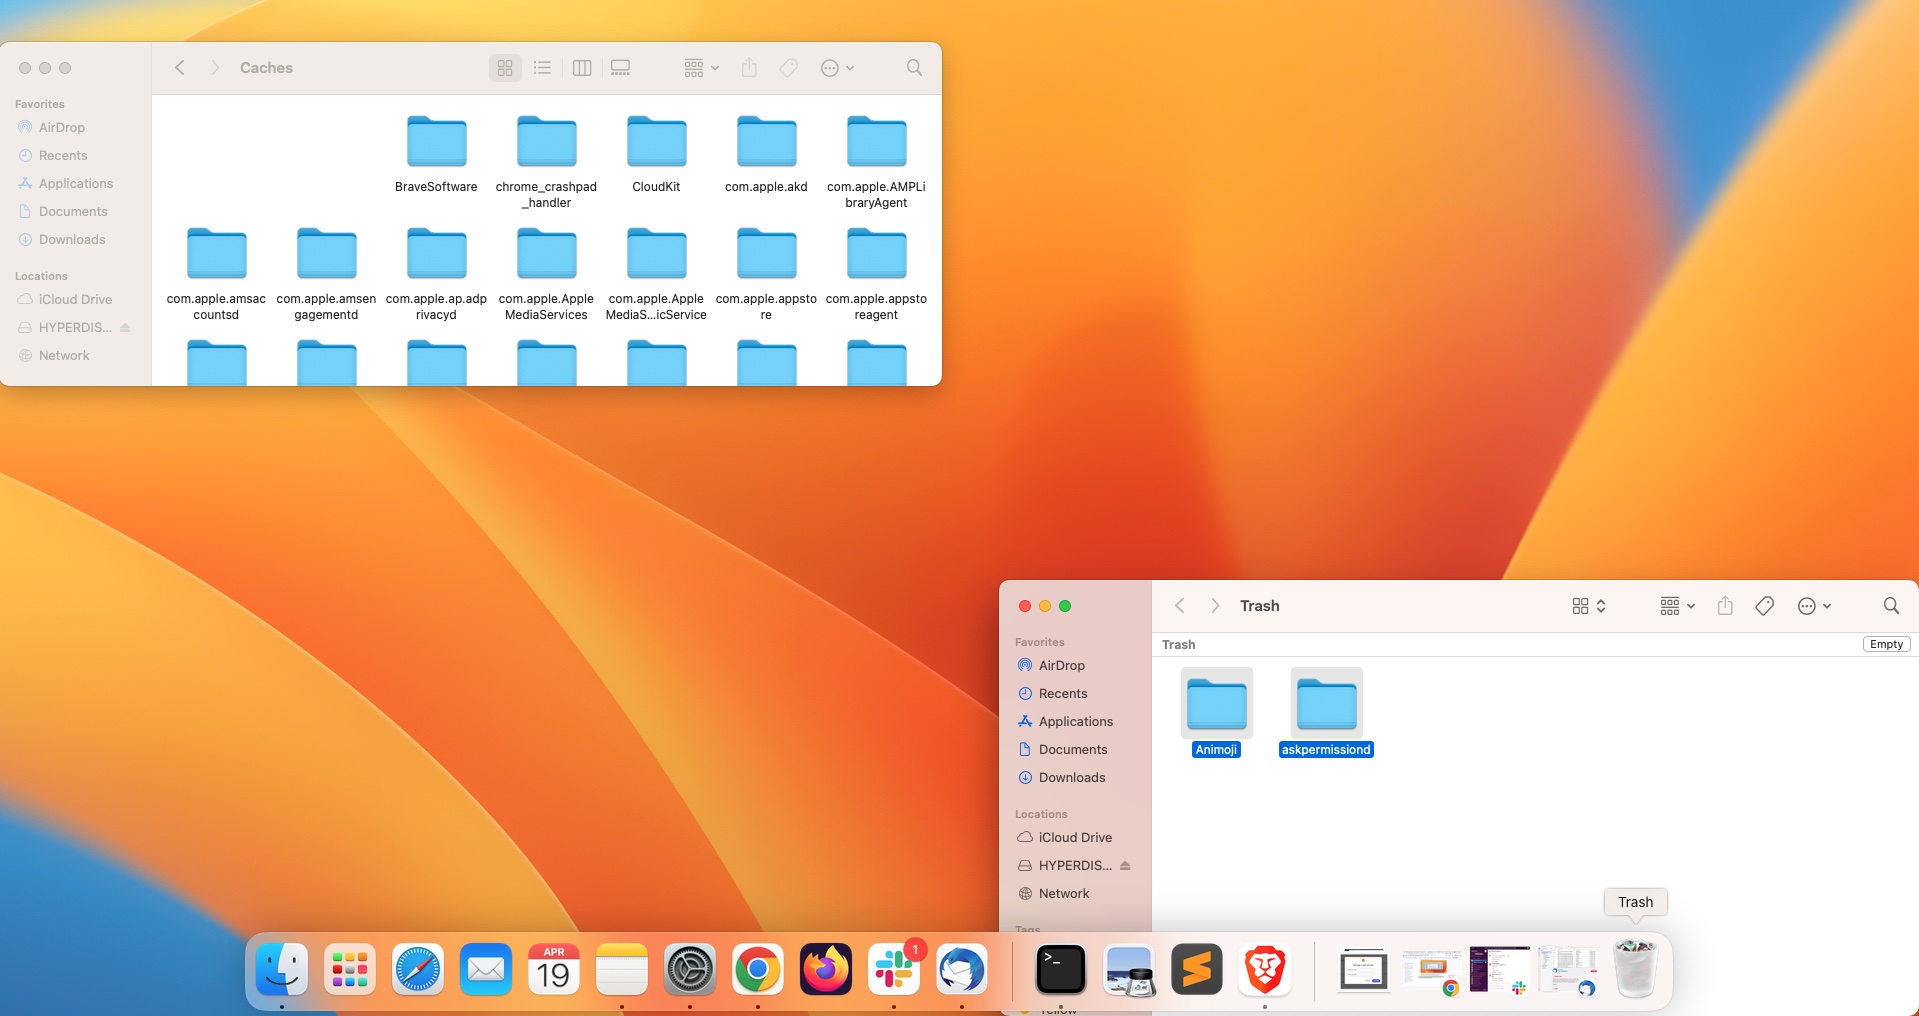
MacOS
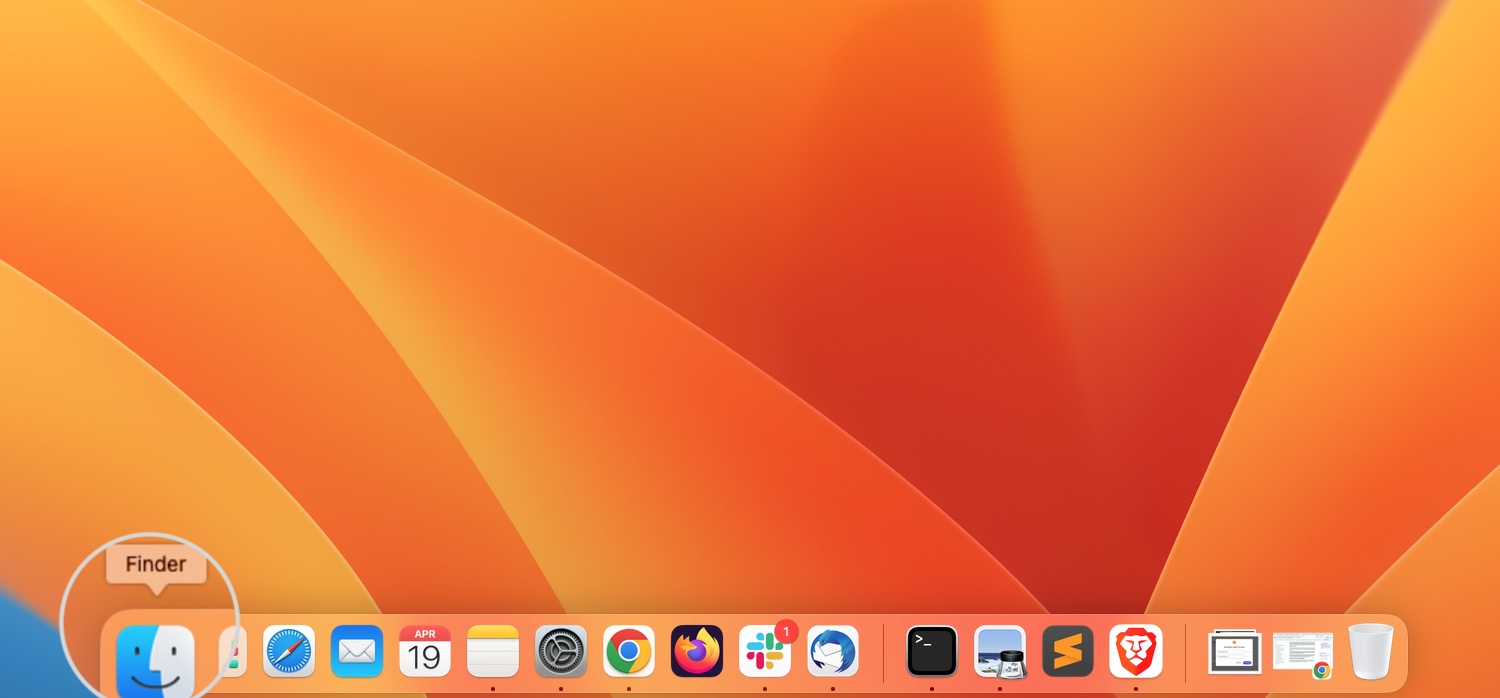
- Open Finder from the Dock menu.
- Press the key combination Shift + Command + G to pull down the Go to Folder menu. Type ~/Library/Caches/, and press Return.
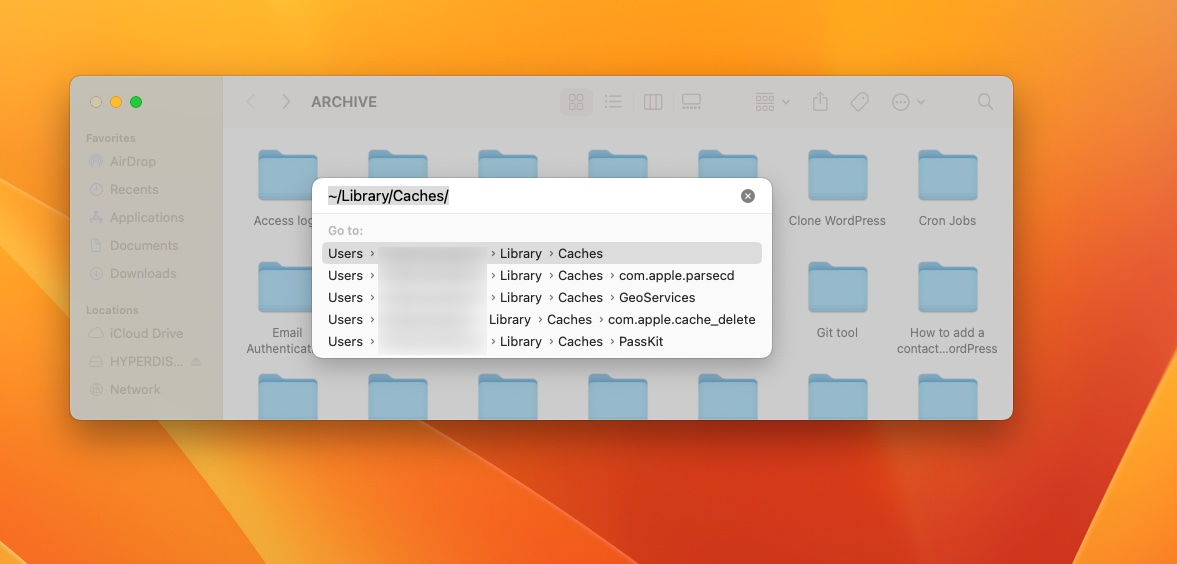
- You’ll see the full range of caches and temporary files stored on your Mac. Be certain which ones you want to delete before sending them to Trash.
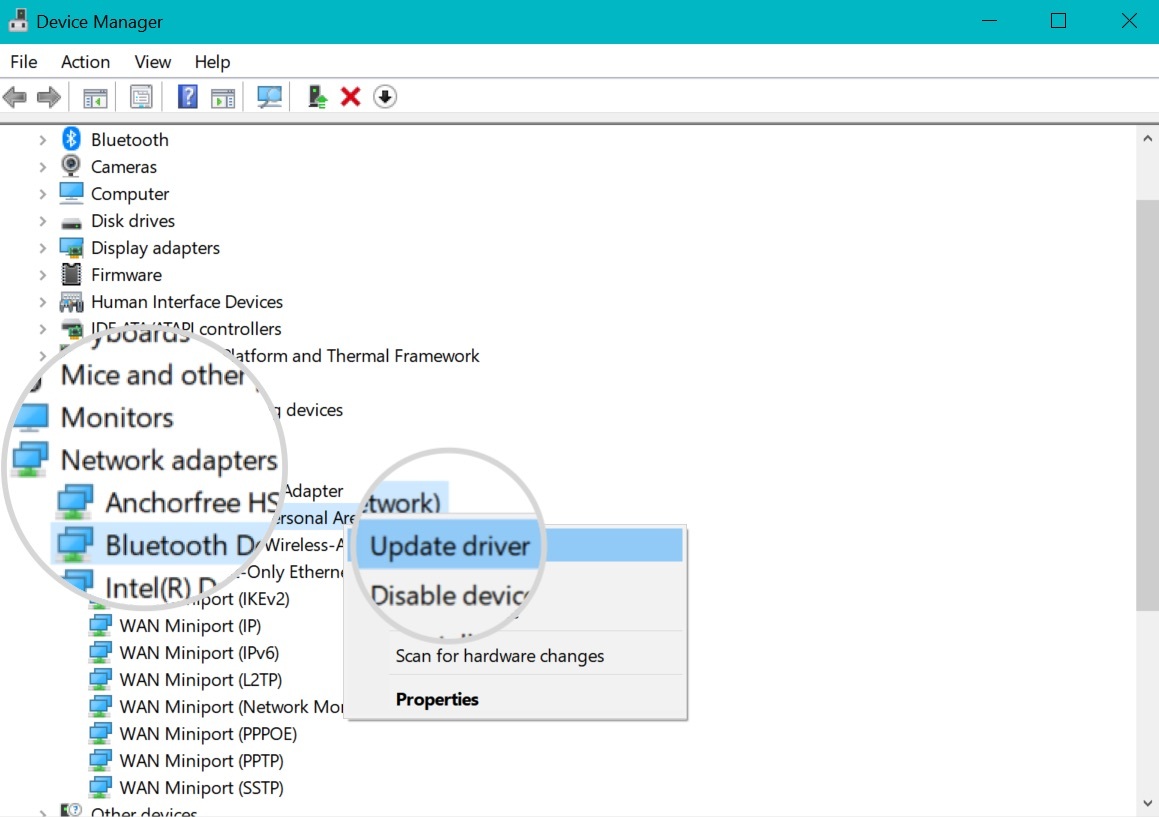
7. Update Network Drivers (Advanced)
Obsolete or corrupt drivers can cause numerous computer networking problems. This includes DNS-related issues such as DNS_PROBE_FINISHED_BAD_CONFIG. To update your network driver on Windows, follow these steps:
- Press the Start button and search for the Device Manager control panel.
- Double-click on Network adapters.
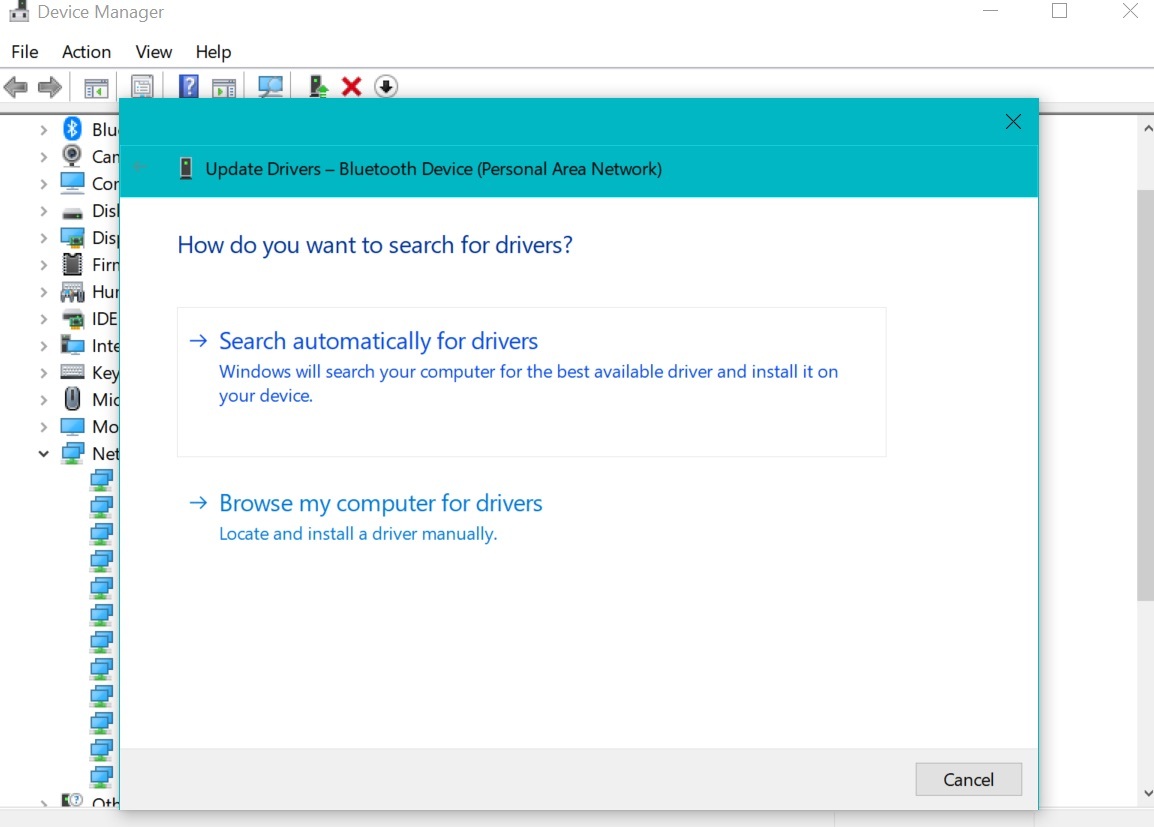
- Right-click on the network adapter you want to update and select Update driver.
- Choose whether you want to search for updated drivers automatically or browse your computer for driver software.
Update Network Drivers Manually
You can also update the network drivers manually. To do it manually, follow these steps:
- Visit the manufacturer’s website and locate the latest driver for your network adapter.
- Download the driver to your computer.
- Open Device Manager and follow the same steps as in the method above to update your driver, but choose the Browse my computer for driver software” option instead.
- Navigate to the location where you downloaded the driver and follow the prompts to install it.
8. Disable the Proxy Server or VPN (Advanced)
Proxy servers and VPNs have many practical uses. However, at times, they can cause connectivity problems when visiting websites. These problems often produce the error DNS_PROBE_FINISHED_BAD_CONFIG.
If you use a VPN (Virtual Private Network), disable it and check if the error is gone. Similarly, open your OS network settings and disable the Proxy server.
A quick way to access the proxy settings is to open the kebab menu in Chrome and select Settings.
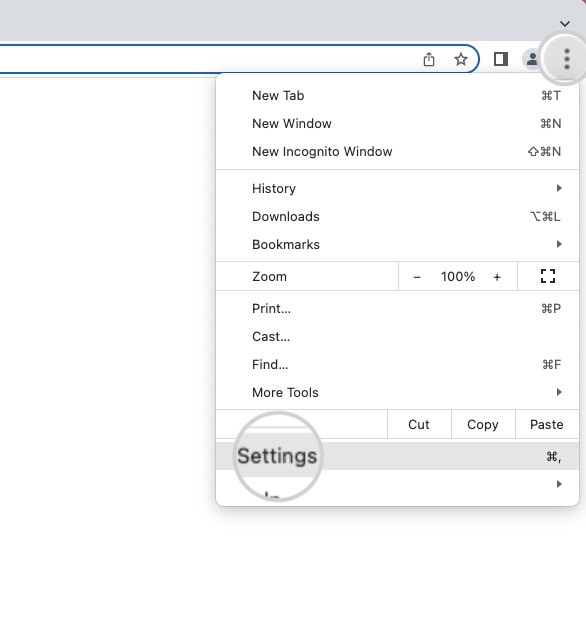
On the following page, select the System section and press Open your computer’s proxy settings. Chrome will automatically open the corresponding proxy settings for your operating system.

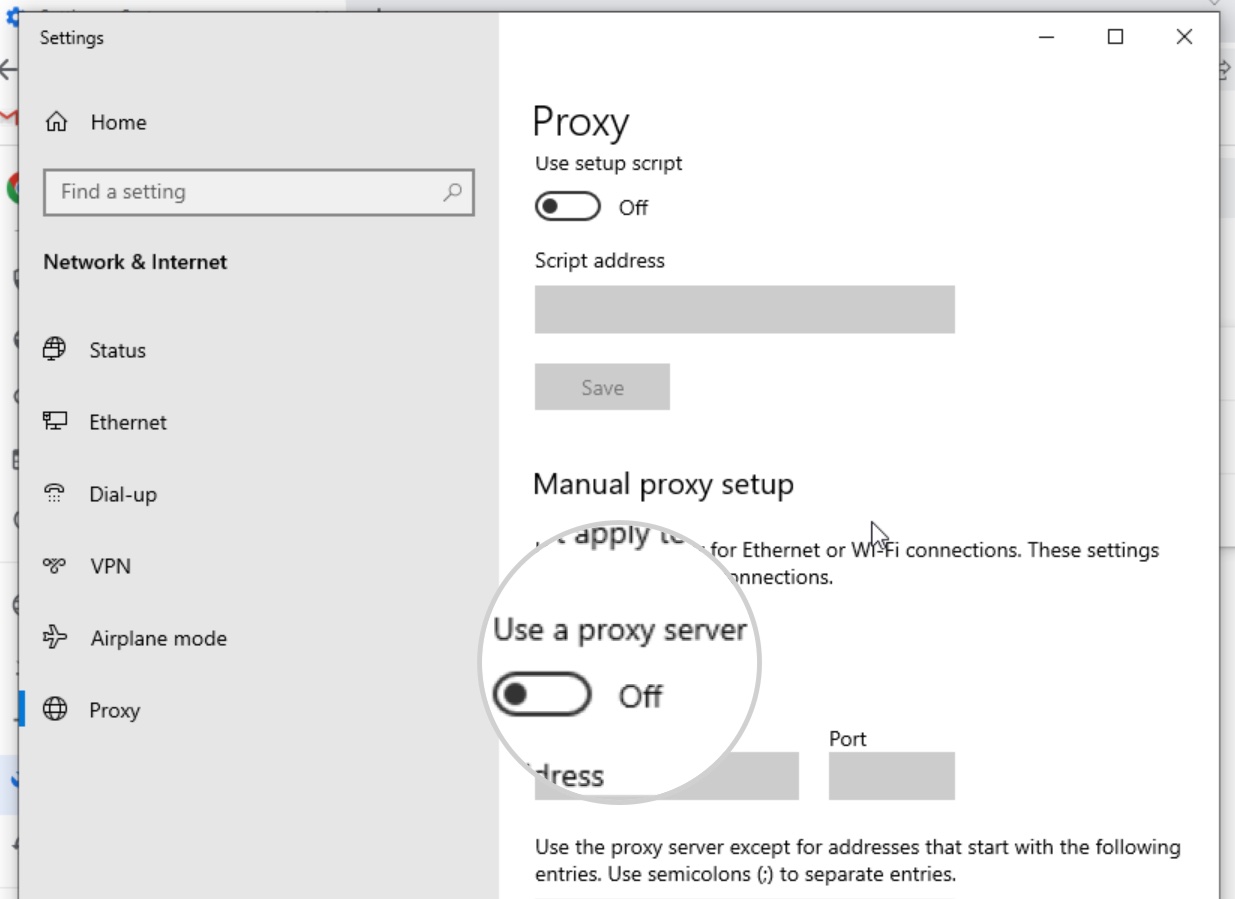
Windows
- On the Network and Internet page, select Proxy.
- Disable each of the proxy server settings by turning off its respective slider.
- Press Save to confirm the changes.
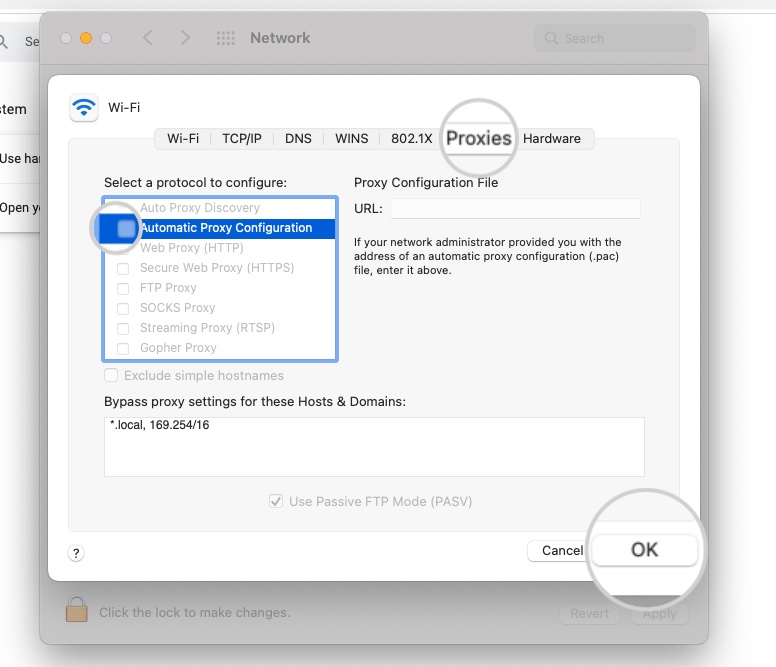
Mac
- Select the Proxies tab on your connection settings page.
- Uncheck the boxes for all proxy options.
- Press OK to confirm the changes.
9. Clear DNS Cache (Advanced)
If you’re having trouble connecting to a website and see the “DNS_PROBE_FINISHED_BAD_CONFIG” error message, it could be because your computer is trying to use old information stored in its own DNS cache.
Clear the DNS cache from your OS to remove expired DNS settings. This may solve the error DNS_PROBE_FINISHED_BAD_CONFIG. You can learn how to clear DNS cache for your particular OS in the following tutorials:
- How to Clear the DNS Cache on Mac
- How to Clear the DNS Cache on Windows
- How to Clear the DNS Cache on Linux
10. Renew Your IP (Advanced)
Many ISPs (Internet Service Providers) assign dynamic IP addresses to their users, which are periodically changed. The service Dynamic Host Configuration Protocol (DHCP) manages this functionality. It is responsible for the correct renewal of IP addresses.
However, sometimes the DHCP server might not renew your IP correctly and could cause connectivity issues. In this case, you will likely see the error DNS_PROBE_FINISHED_BAD_CONFIG when visiting websites.
You can request a new lease of an IP from your DHCP server which will assign an available IP address. Read further to find the steps of the process on Mac and Windows.
Mac
- Open System Preferences from the Dock menu. Click on the Network icon.
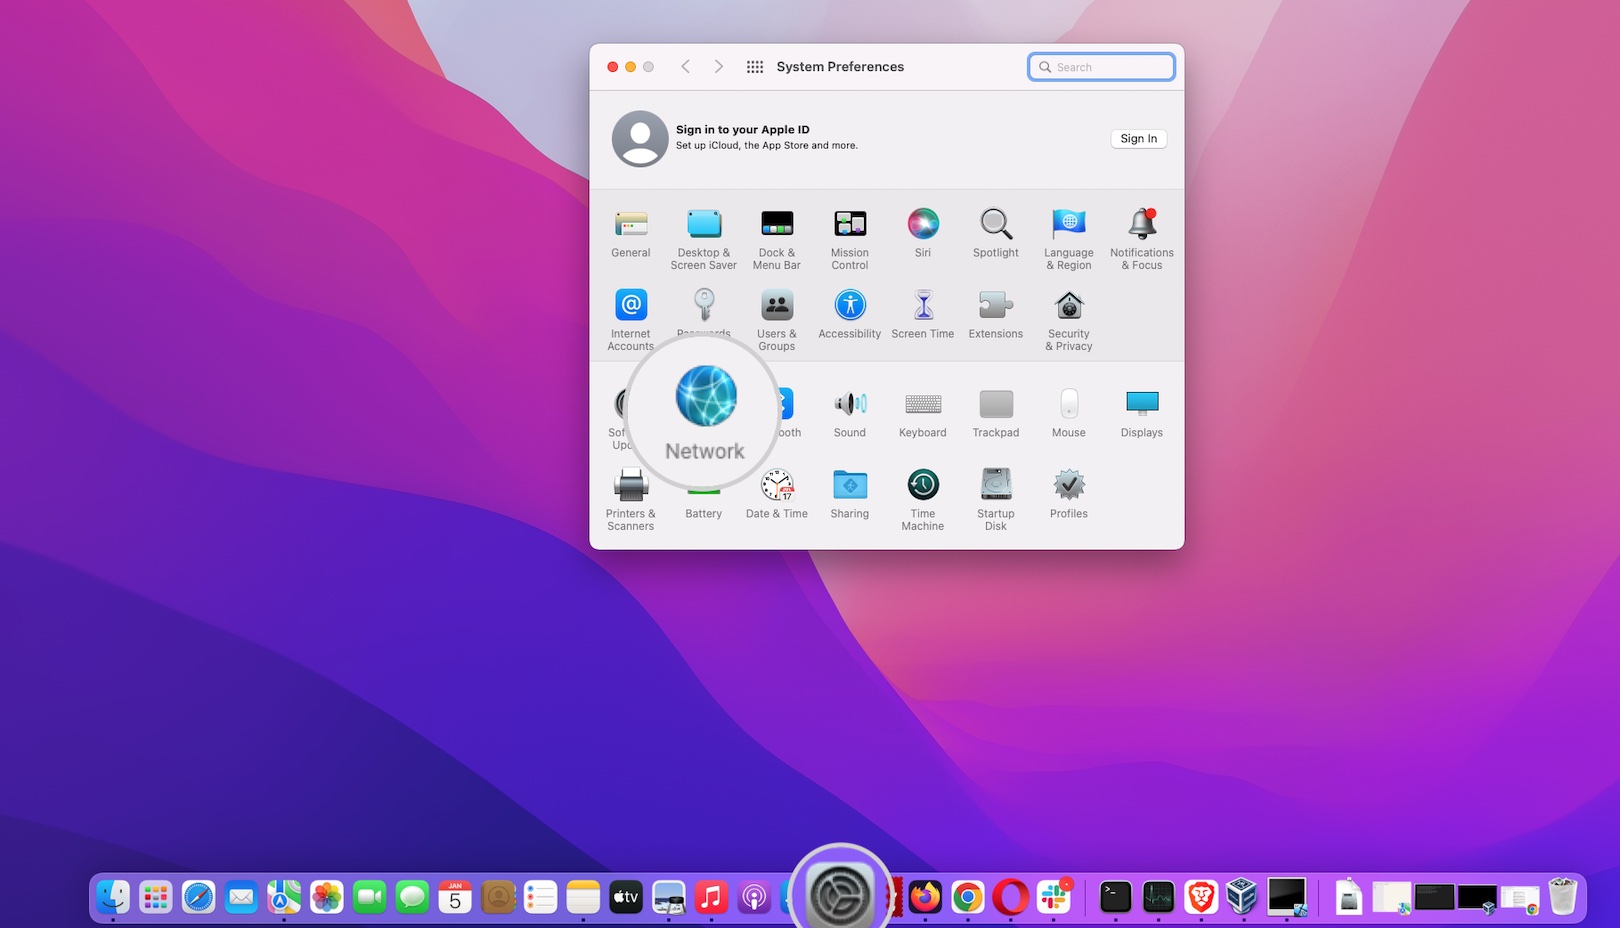
- Select your current network and click on the Advanced button.
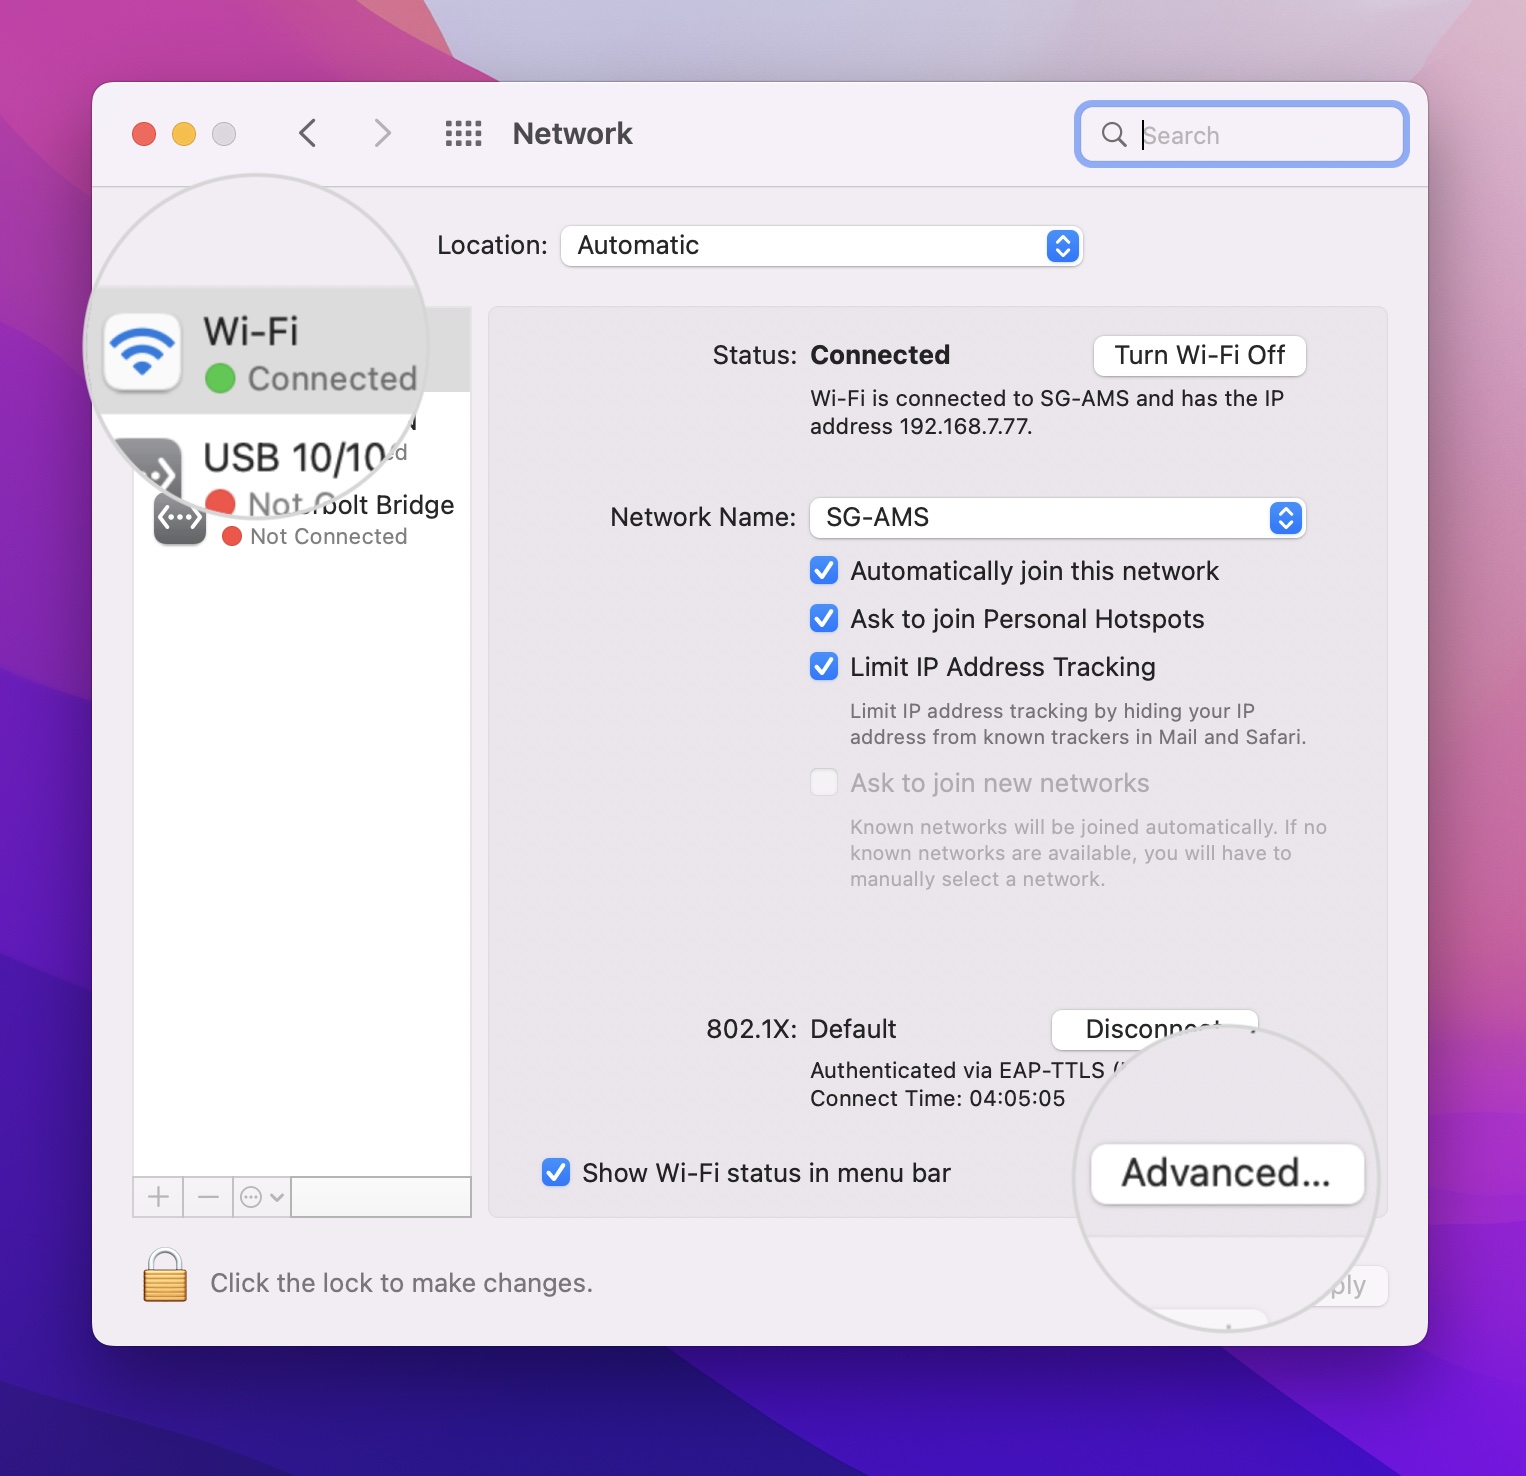
- Choose the TCP/IP tab and click Renew DHCP Lease.
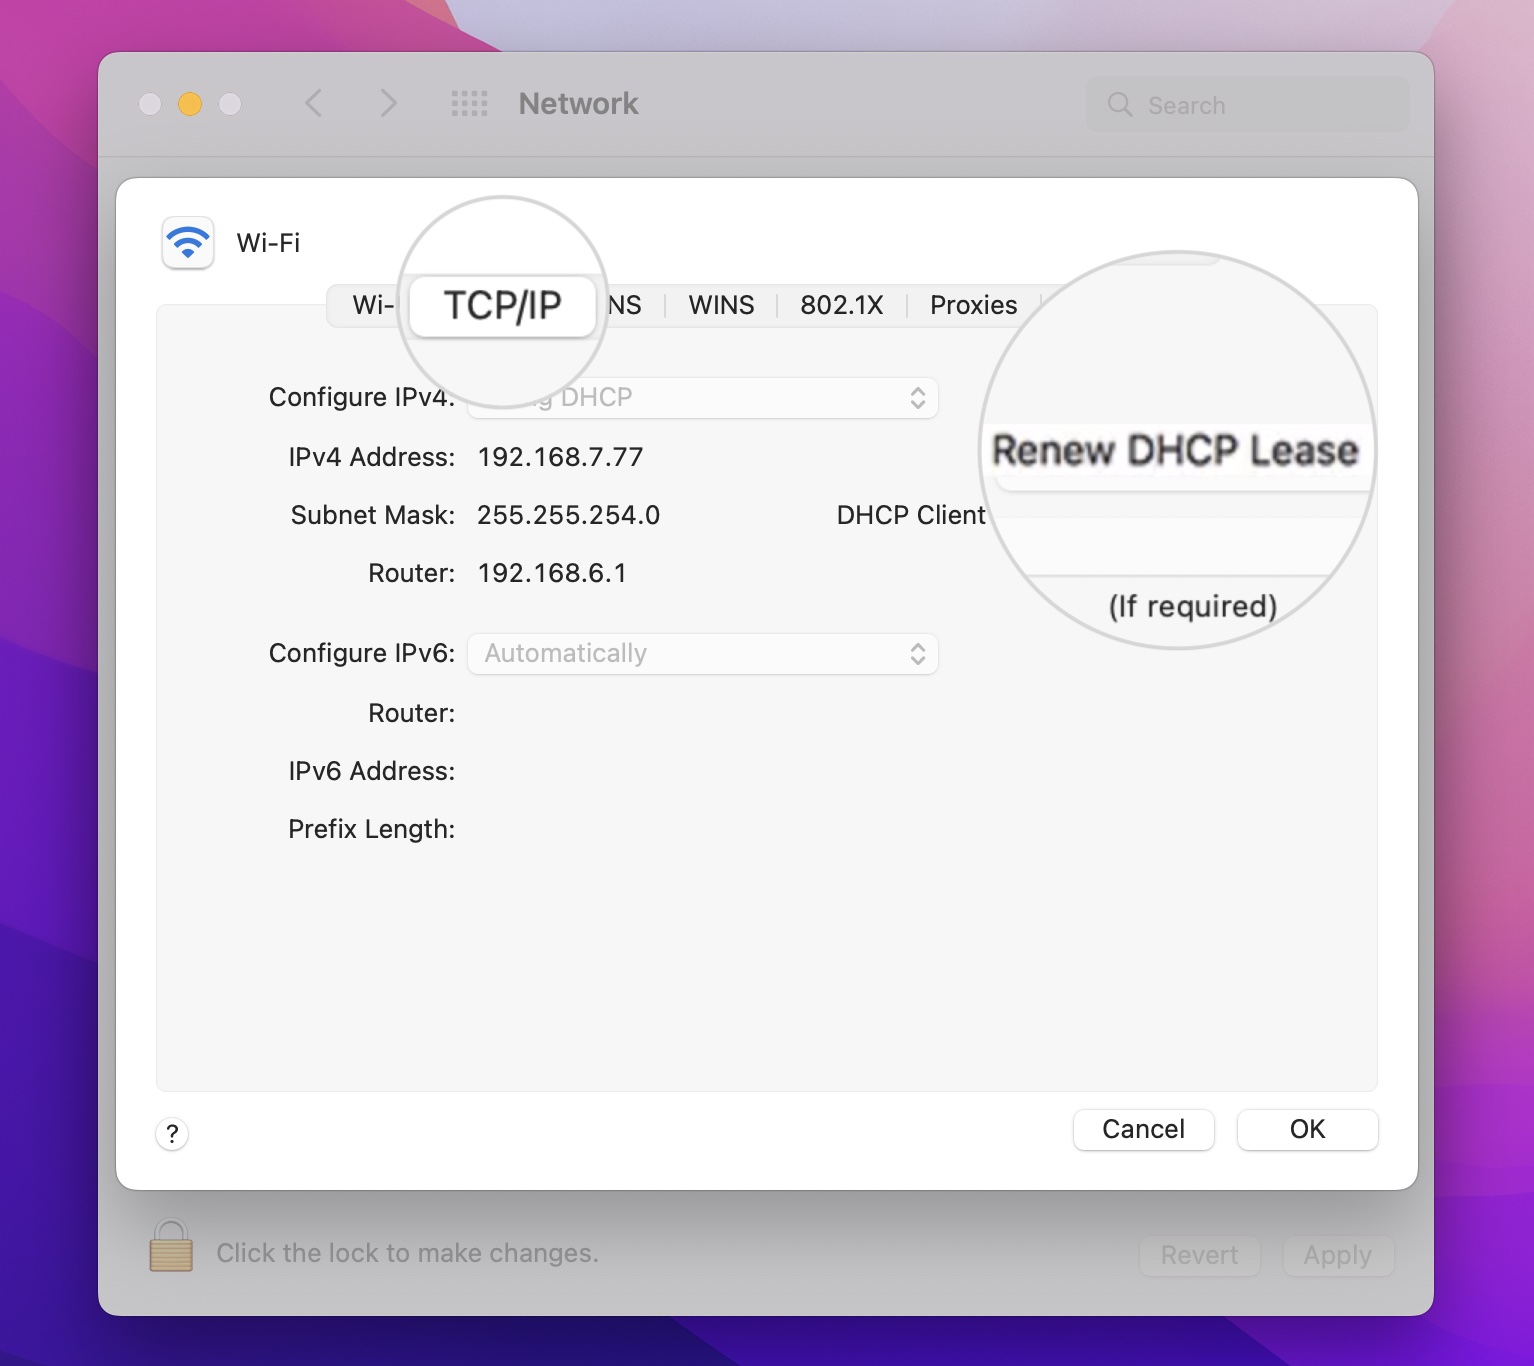
Your Mac will request a new IP from the DHCP server. Reload the website to check if the error is now resolved.
Windows
- Open the Windows menu in the lower left corner.
- Type in the search bar “cmd” and click on the Command Prompt icon, which will appear as the first result.
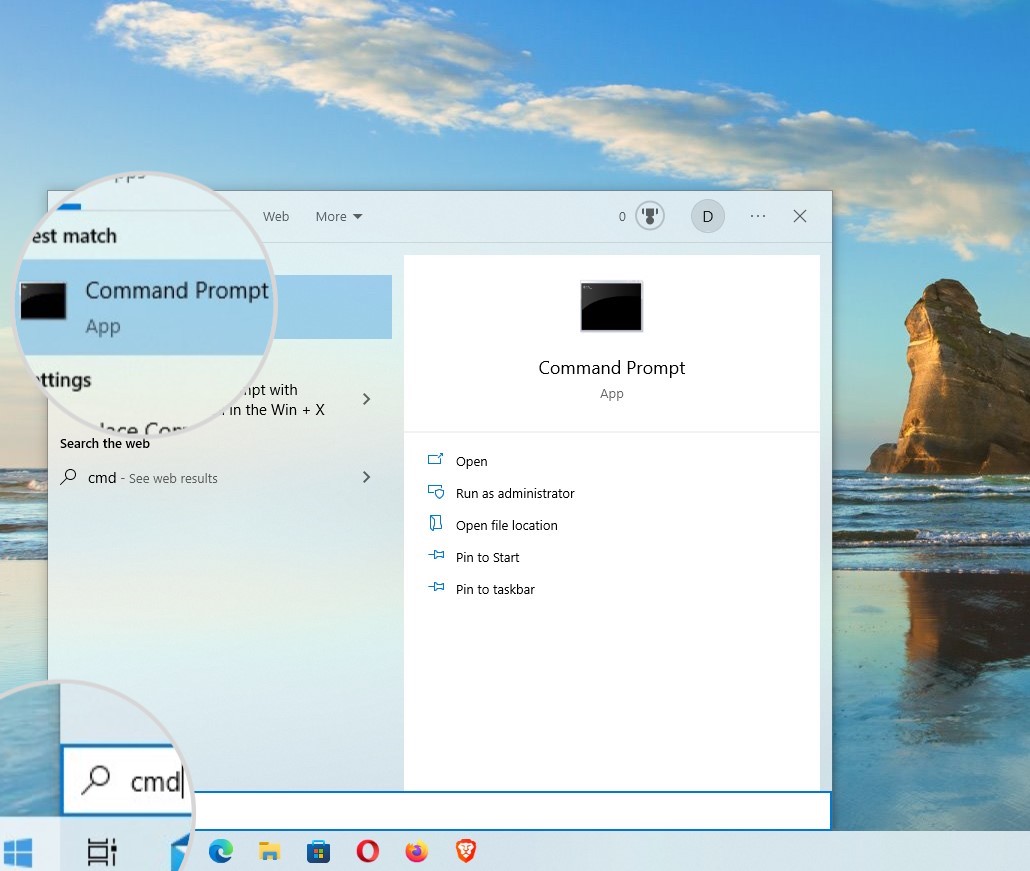
- In the Command Prompt window, type the following command to release your current IP address:
ipconfig /release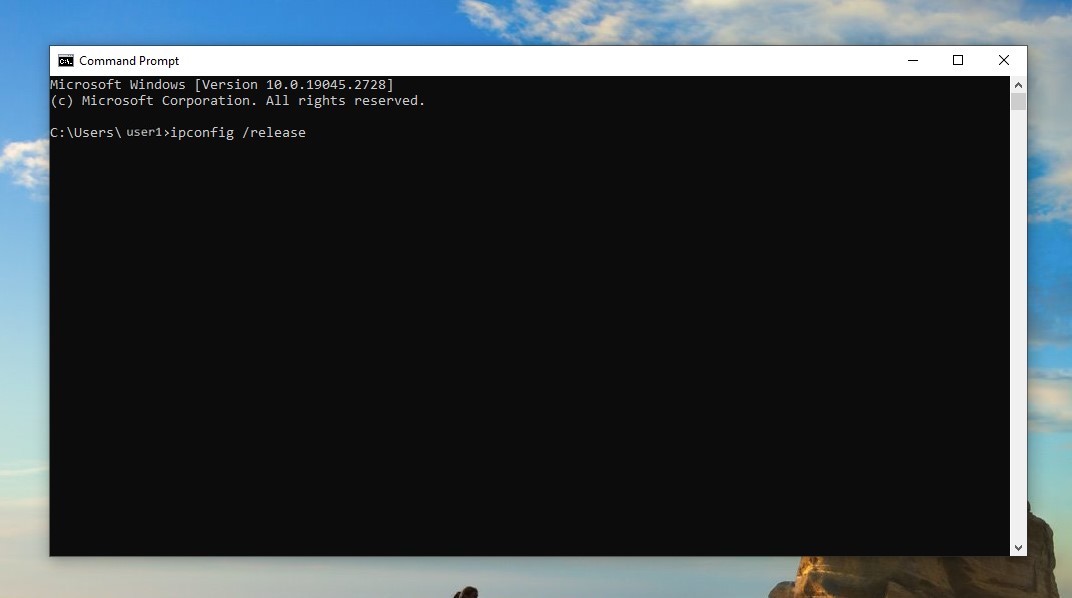
- To request a lease of a new IP, execute the command:
ipconfig /renew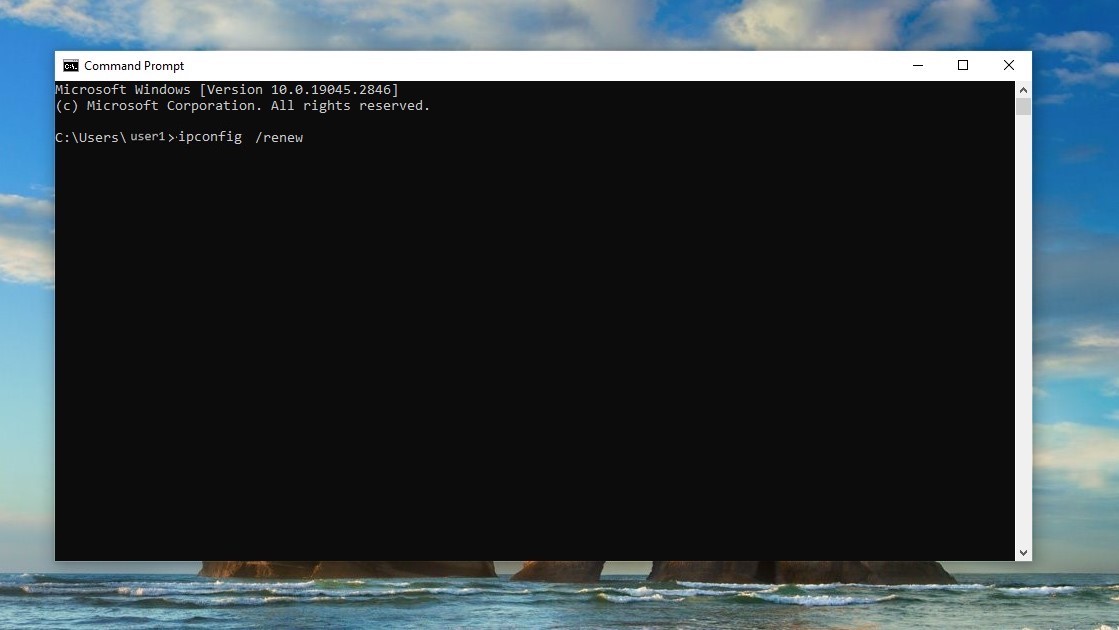
11. Manually Change the DNS Settings (Advanced)
The DNS server your OS uses may be temporarily down, which could cause the error DNS_PROBE_FINISHED_BAD_CONFIG. To solve this error, try using different DNS servers.
You can use the free public DNS servers of Google or Cloudflare.
- Google DNS server addresses – 8.8.8.8 or 8.8.4.4
- Cloudflare DNS servers – 1.1.1.1 or 1.0.0.1
If you want to change your DNS settings manually, the process will depend on your operating system.
Here are the instructions for changing DNS servers on popular operating systems.
Change the DNS Servers on Windows
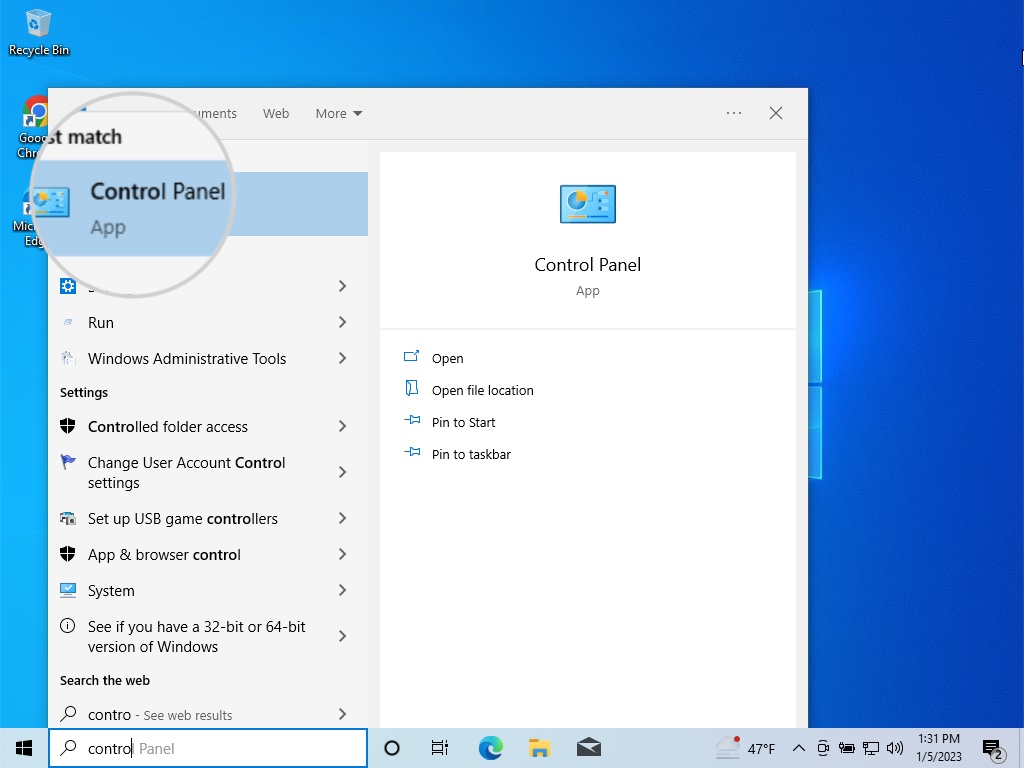
- Open the Windows menu and type “control panel.” Click on the Control Panel icon, which is the first result.
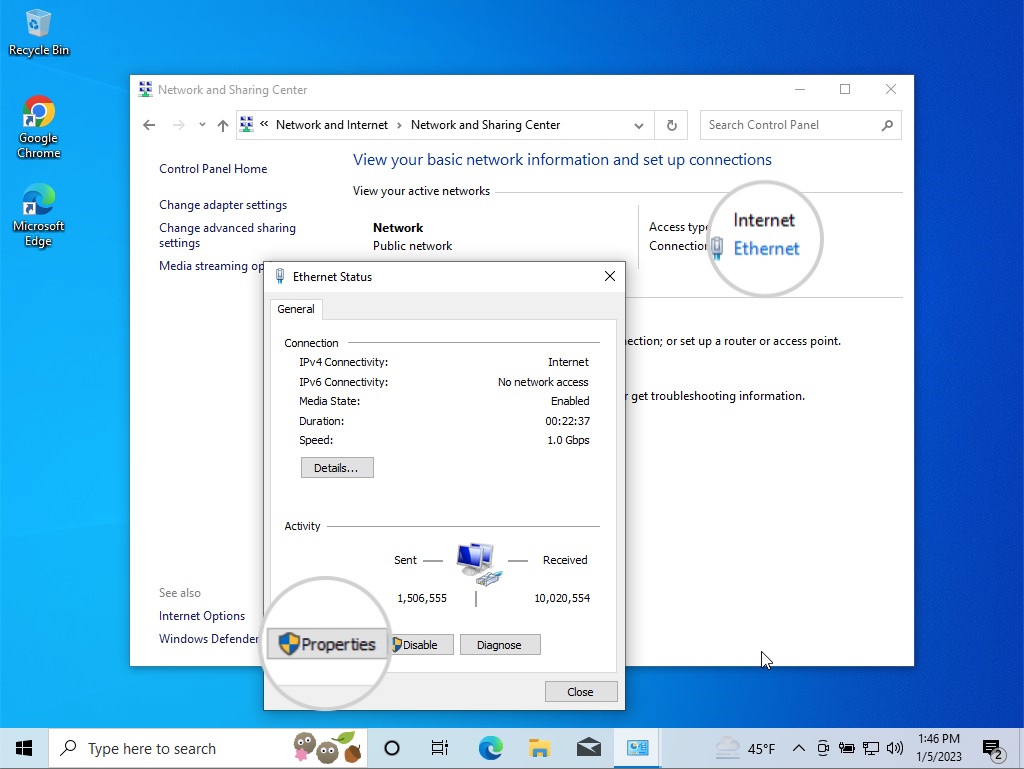
- Click “Network & Internet” and choose “Network and Sharing Center.”
- Choose either Ethernet or Wi-Fi, depending on your connection type.
- On the new pop-up window, select Properties.
- From the list This connection uses the following items, find Internet Protocol Version 4 (TCP/IPv4) and click Properties.
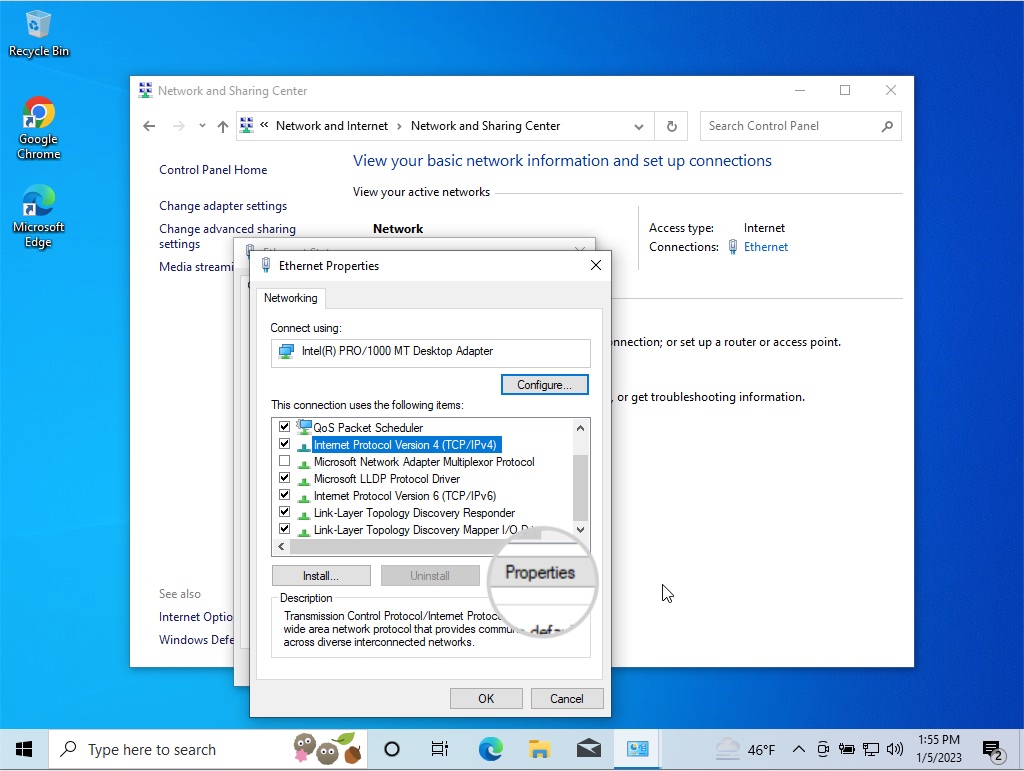
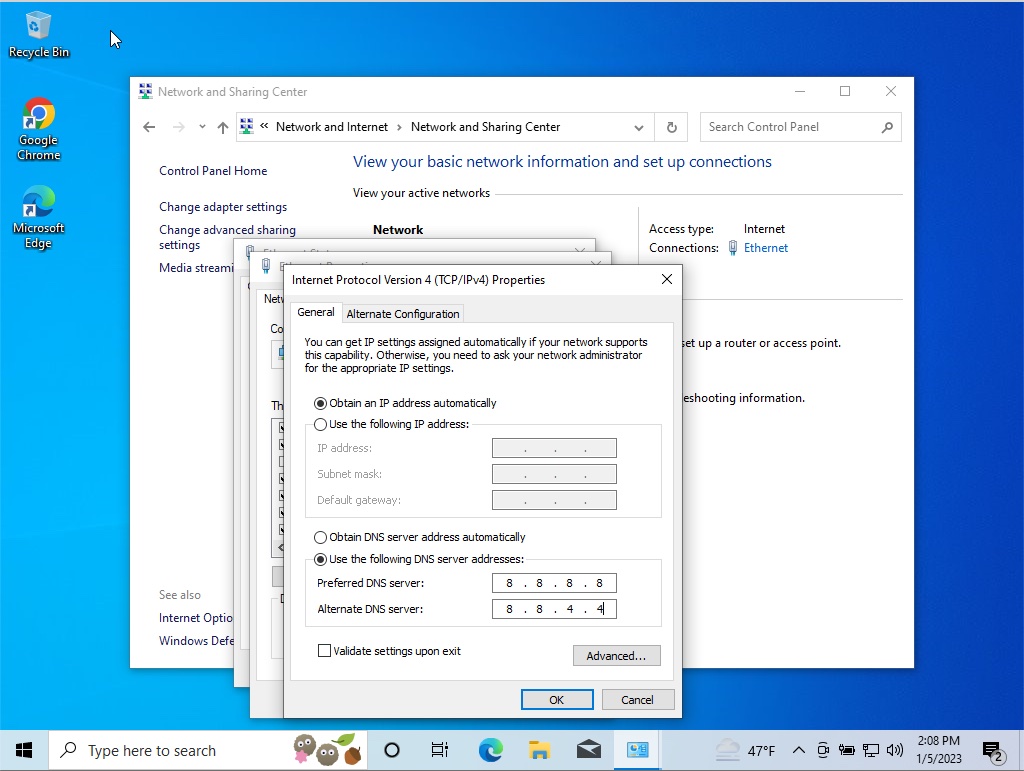
- Select Use the following DNS server addresses. Type the address of your new DNS server in the field Preferred DNS Server. Add a secondary DNS server in the field Alternate DNS server.
Change the DNS Server Addresses on Mac
You can also change the DNS server if you use Mac by following the steps below.
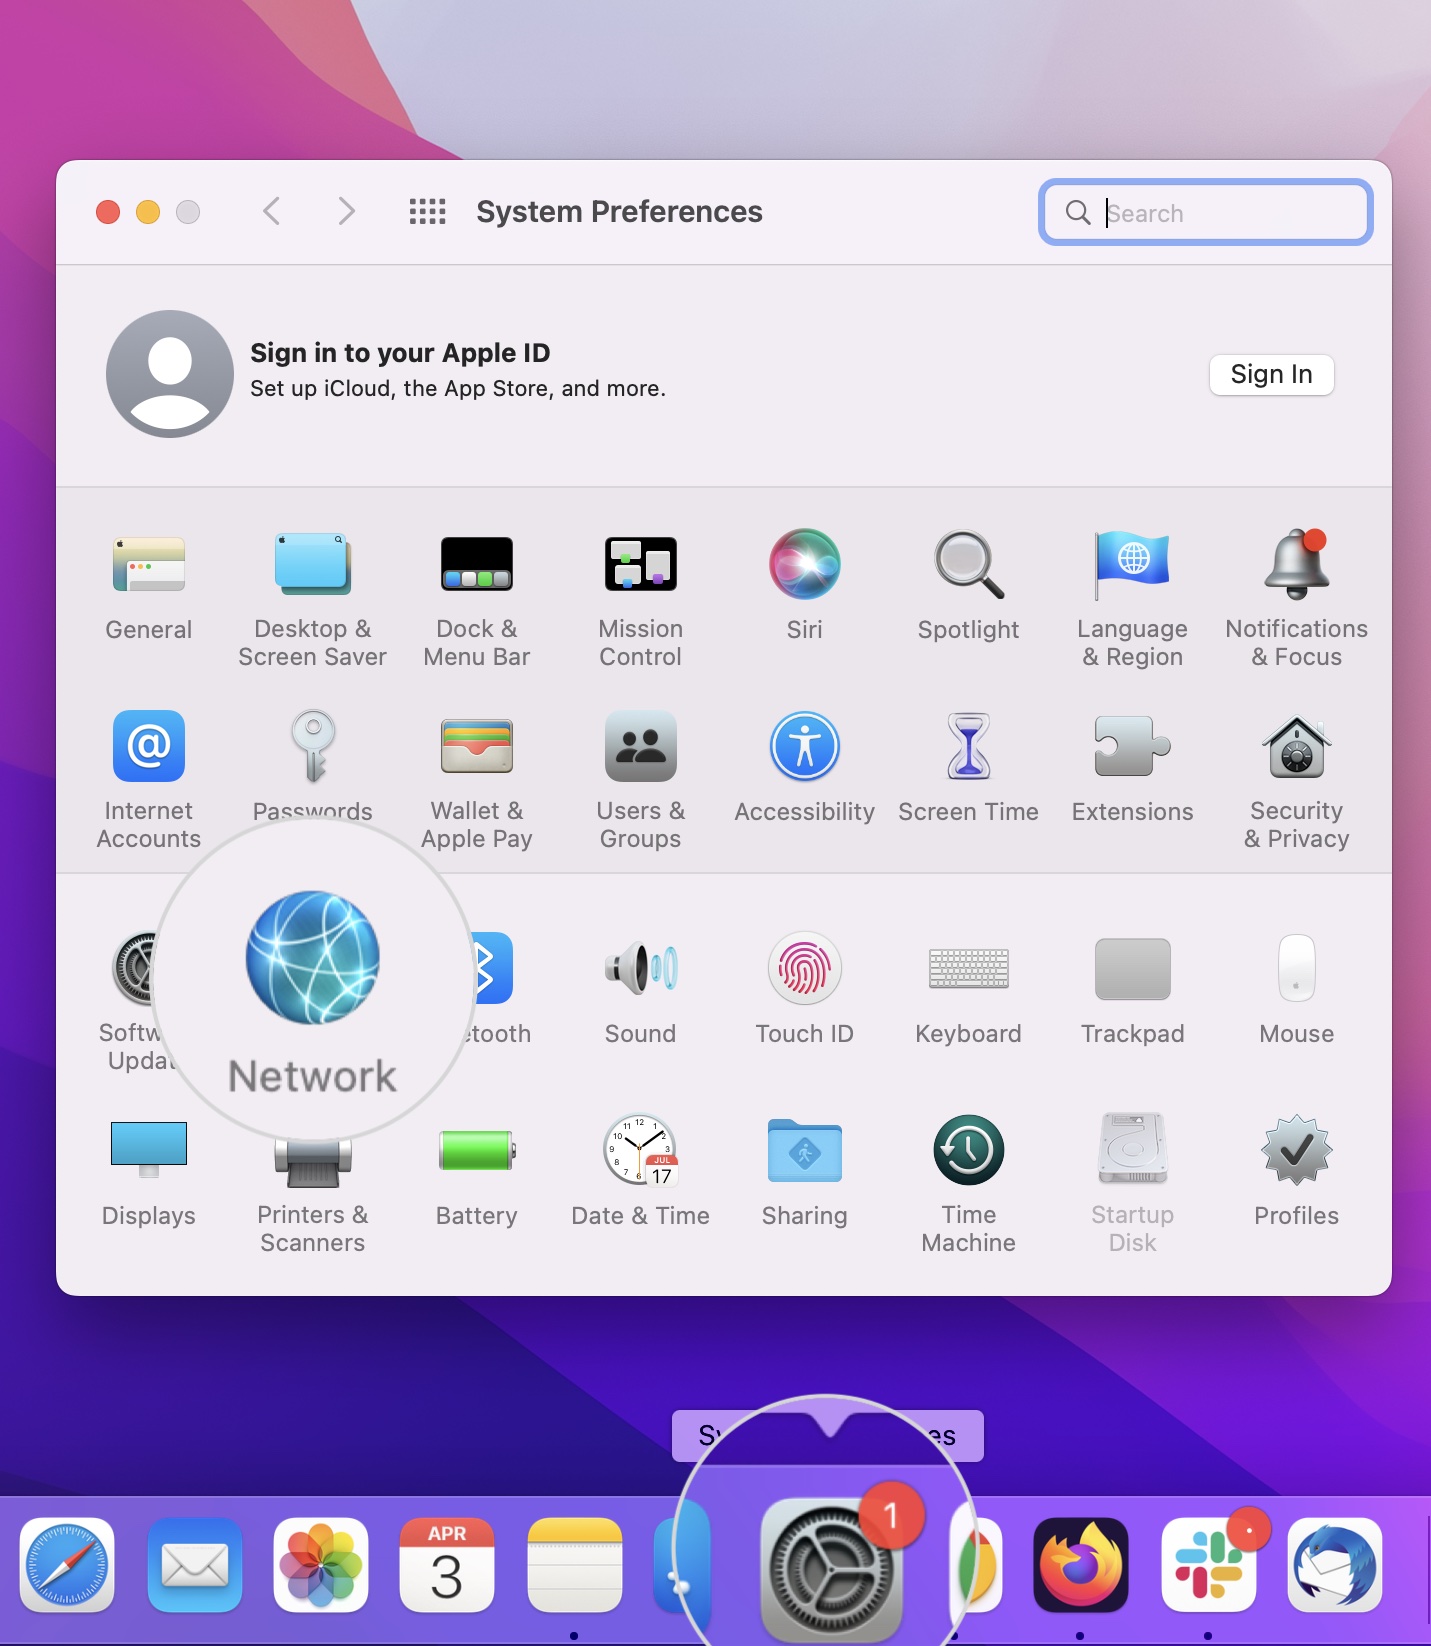
- Open System Preferences and select Network.
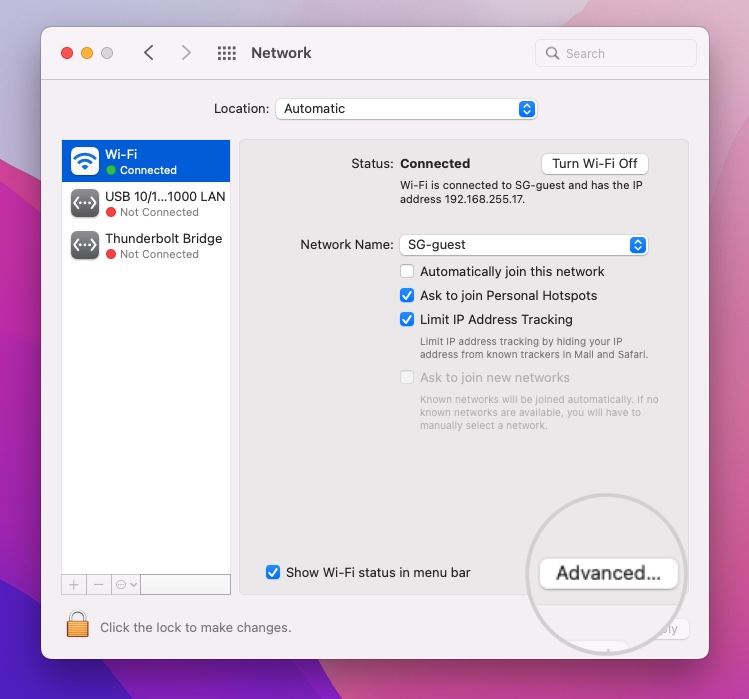
- Choose your current internet connection and press the Advanced button.
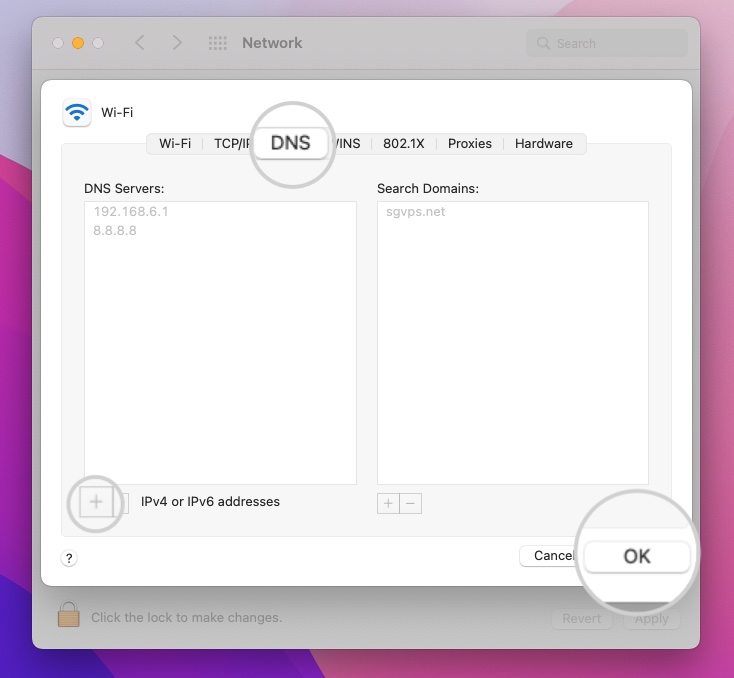
- Open the DNS tab and add the new server by pressing the “+” sign under DNS Servers.
Remember that the specific steps for changing your DNS settings may vary depending on your OS version and network configuration.
Conclusion
In conclusion, the DNS_PROBE_FINISHED_BAD_CONFIG error can be a frustrating issue to deal with, but it’s usually solvable. The error occurs when your device cannot connect to a DNS server due to several factors, such as incorrect DNS settings, a faulty DNS server, or a firewall blocking access to the DNS server.
To resolve the issue, you can try restarting your router, clearing your browser cache, changing your DNS settings, disabling antivirus software and firewalls, updating your network drivers, and more.
By following the solutions provided in this article, you should be able to resolve the DNS_PROBE_FINISHED_BAD_CONFIG error and get back to browsing the web.